Leaderboard
-
Disciple
Platinum Members3Points2092Posts -
jc12
Members1Points385Posts -
Foxpuppet
Members1Points874Posts -

NoGi
HOF Member1Points5858Posts
Popular Content
Showing content with the highest reputation on 02/01/16 in all areas
-
2 points
-
1 pointIt's both but mostly to help newcomers to the hobby land on their feet and help in any way they (mentors) can.1 point
-
Wow the rack is coming along nicely JC! That big tank looks great but seems to be lacking a real wow factor plant.... Might I suggest a Crinum hahaha1 point
-
Awesome setup. Thanks for the update @jc12. Everything looks really good. Sounds like you have some very nice shrimp too.1 point
-
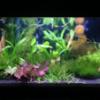
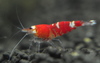
It has been two months since my last update. I have not been motivated to try complete the rack as it is currently running fine, even though it is not the 'aesthetically pleasing' look I promised my wife when I first convinced her to allow me real estate space in the lounge room. She hasn't been complaining... so I got lazy. @Disciple asked for some photos and that got me started working on this again. Haha. So first up... night lights. Night lights are highly recommended for breeding discus so that the parents can see their fry easily, especially the crucial first few days of free swimming when the fry need to 'attach' to feed on mucus off the body of the parents. I pretty much did the same LED build in my earlier post here except it is a much shorter version and I used a different type of switch so I can vary the intensity of the lights if required. The photo only shows two but I made three of these, one for each tier. I mounted them in the middle of each tier so a night light is shared by two tanks. Next I tidied up the messy wires dangling across the rack using electrical trunking from Bunnings. The dangling wires were a pain as they get in the way whenever I wield a net to try catch/sort fish/shrimps. Before. After. Before. After. Full rack shot. You would notice that the light on the bottom tier is dimmer because I only ran a single LED strip. I have always plan to use the bottom tier as fry grow out/hospital/quarantine so I avoided bright lights. The light for the sump is usually switched off. I only turn it on when I am cleaning or doing water changes via the sump. Also, the LED strip lights on the middle tier is currently not in use. I am running an Up Aqua Pro Z light from @newbreed. You can get these awesome lights from Newbreed Aquatics. Full rack shot with night lights. Ok... now let's talk shrimps. Isn't this a shrimp forum after all? Full tank shot of the shrimp tank as it is now. From left to right... Section 1 houses my YCS, some from @buck, and my recently acquired CRS from @Gbang. I have always love CRS and wanted to restart a quality pure CRS colony. I think many of you would know the quality of Glenn's CRS... some of them even have sexy red legs!!! I also got some PRL 'culls' from him but they are housed in an entirely separate planted display tank (see further down this post). The YCS are showing great colours but they are still not breeding for me. I hope they would be able to adapt to TB water parameters. Fingers crossed. Section 2 is home to my BB and GB female mischlings. I have my best BB stud male with 3 x BB females and 10 x GB female mischlings. Talking about a harem... haha. Unfortunately, the Bloody Marys I introduced as guinea pigs when I first set up this tank did not survive. It was probably too tough on them to adapt to very different water parameters compared to the tank they were moved from. Section 3 has my KK, Panda, RR, WR together with my CBS/CRS female mischlings. No surprises here and breeding activities have resumed since their move. Section 4 is where all my TB culls and CBS/CRS/GB mischling juvies live. This is also where I look out for female mischlings to be moved into Sections 2 or 3. Sadly, similar to the Bloody Marys, the black cherry culls I used as guinea pigs didn't survive. As mentioned earlier, the PRL 'culls' I got from Glenn are going to this tank. Hopefully I will be able to selectively breed and cull to achieve nice beautiful quality PRLs. Next step is to complete the paint job for the MDF panels and wrap up the rack like how it is here. Thank you for following my first rack build this far. I know progress has been excruciatingly slow but hey, it is about enjoying the journey as much as arriving at the destination.1 point
-
 1 pointMine hide quite alot to the point I didn't know they had eggs till I notice a few quite big babies on the glass don't see the big male for months at a time he has dug a hole under the back of my bogwood which is where there eggs hatched And it looks like you quite a few potential hiding spots probably around bogwood as they graze on it1 point