Leaderboard
-
FMuscle
Members7Points134Posts -
Disciple
Platinum Members7Points2092Posts -

NoGi
HOF Member7Points5858Posts -

OzShrimp
Members4Points4102Posts
Popular Content
Showing content with the highest reputation on 12/20/15 in all areas
-
3 pointsSome of you have probably noticed. But for confirmation, I am a big fan of not paying if I don’t need to. This means I’m a big fan of DIY. I made PVC overflow and return pipes tailored to my 3ft, I made a $10 sump for it as well, I built an air powered substrate vacuum. I made my life cheap and easy for this hobby. This article came at the expense of a disaster. I bought a 6x2x2 tank. It cracked. Not to throw the towel, I took it apart, had panels cut in half, new panels made, and here is my tutorial on how to build your own fish/shrimp/planted tank. First, build a stand for the tank. Get your glass panels ready. To figure out what sizes you need, remember that the bottom supports the sides. Your bottom panel has to be the exact width and length as you planned tank. A 100x50x40 tank with 10mm thick glass needs a 100x50cm bottom panel. The front and back are the same width as the bottom, but the glass’ thickness shorter than the projected height. For the example, front and rear panels would be 100x39cm. The sides sit on the bottom, and between the front and rear panels. Subtract the thickness from the height once, and for the width twice, here the sides would be 48x39cm. If you are reusing old aquarium panels, scrape them clean with a razor blade, then wipe off any silicone residue with acetone. Let dry. Tools needed: A good razor blade or sharp utility knife, tape, either electrical, masking or both, a caulking gun, twice the silicone tubes you think you’ll need, optional are suction cup handles to move the glass around, I did this build alone, it helped for the big panels. Get your work area ready, cover the floor, table, bench you’re working on. Have moist rags and/or gloves at your disposal. Make sure your work surface is flat, clean of debris and level. Put your panels within easy reach. You have limited time to work with silicone, it starts to skin, to dry its surface fairly quickly, so you have to be organised. The longer the seam, the faster you need to work. Apply the first bead of silicone on the bottom panel where the rear panel will sit. How thick depends on how experienced you are, and how thick your panels are. In my case, I did a bead of around 10mm, because my glass is 10mm thick. Do not worry about putting too much. Too much is better than not enough. Put the rear panel in place, making sure it sits right on the edge of the bottom panel, flush on both sides. Have someone or something hold the panel up for a moment. Apply a bead of silicone on one side of both the bottom and the rear panel, and while keeping the rear panel slightly tilted back, put one of the side panels in place on the bottom panel. Then bring up the rear panel and push it against the side panel, making sure they’re square and flush with each other. They will now hold each other with the silicone. Put a piece of tape or two across the corner as extra support. Repeat the operation on the other side, this time lay the side panel a few mm off to the front and slide it in place against the rear panel. Make sure they’re square and flush, and tape them. Apply silicone on the front top edge of the bottom panel and the edges of both side panels. Bring your front panel at an angle, sit the bottom first, make it flush to bottom panel, then press it against the sides. Square, flush, tape. Let the tank cure for about 24 hours. Watch your berried shrimp in the meantime. Once the silicone is dry, remove the excess with a sharp blade. Trim the inside carefully, just to remove the excess and not to dig and cut between the panels. There is no real need to use acetone there, it is mainly used because new silicone doesn’t stick well to old silicone. So unless you went crazy on the amount of silicone you put on the first part and it went everywhere, you can leave the little bits around the corners. Tape the edges of the tank leaving the corners exposed. About 5-10mm is good, some prefer to leave a wider gap around the bottom. Apply silicone to the corners, starting around the bottom, then go up in the corners. You don’t need much there, a good bead size would be around 80% of the gap you left with the tape. Smooth out the silicone with your finger to give it a nice concave shape. Remove the tape while the silicone is still wet. Take care of not putting silicone everywhere and not to destroy your awesome corners as you remove it. Let the tank cure once more, for three to seven days this time. Why not watch your fish play in the bubbles? After the curing is done, do a test fill. If possible do it outside. If not, I suggest doing it slowly, adding a few cm at a time and constantly monitoring the seams for any signs of leakage. The test fill is also a good moment to see if you need to brace your tank. As you fill your tank, measure the distance between the front and back on both sides and compare the results with the measure in the center. If your panels are bowing by the same or more than their thickness, I’d recommend a brace. In this case, the bowing is only 1-1.5mm while the tank is ¾ filled. I do not need bracing. If everything is in order, scape, plant, fill, cycle, stock and enjoy your new DIY tank. Side note: if you are building a small tank, the cure period between the assembly and the reseal may be skipped by working fast enough to smooth the silicone as you go. On bigger tanks, like my 6ft, by the time I fit the panel, the silicone is already drying where I started to lay the bead, making it impossible to create a clean seam. My tank's specs: 6X2X1 (1830x610x310mm) 10mm thick glass. Filtration: Sponge + double overflow to sump (to be built). Stand: DIY 70x35 timber, 1830x610x800.3 points
-
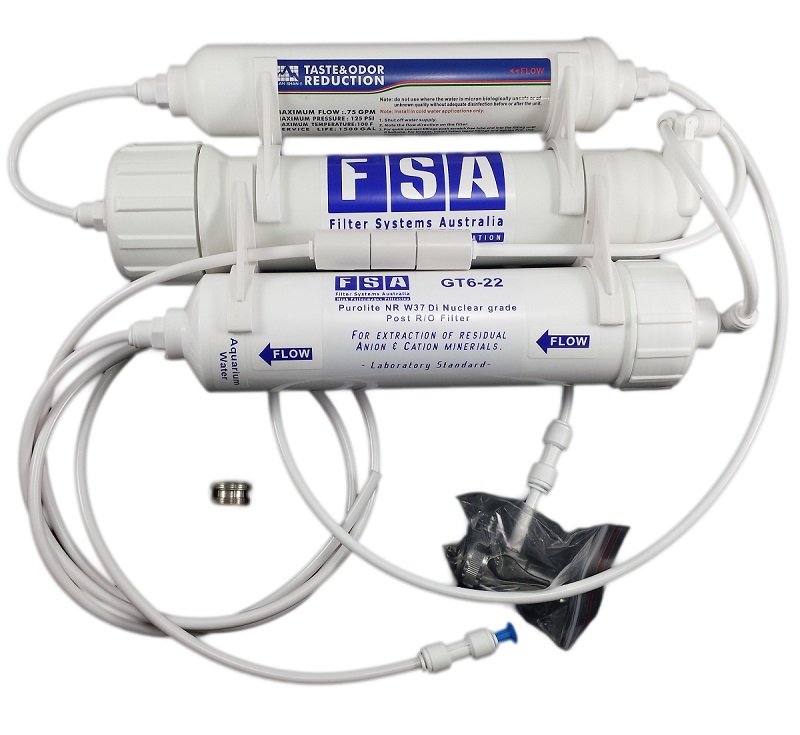
The Task: To write some content (Library Article, How-to, etc…) here on SKF that helps existing and new members in furthering their knowledge in the hobby. Publish it to the appropriate section of the site and place a link back in this thread. I will select a winner the day after the competition closes. Because you are contributing quality content to the forum, I’ll waiver minimum post count for this comp. Due to shipping costs, this is limited to Australian SKF members only. SKF staffers can also participate as they will not be part of the winner selection process. Timeframes: Start: Now Ends: 21st December, 2015 Winner announced: 22nd December, 2015 The Rules: Must be your original work Can’t be published anywhere else Own pictures should be used – where there is a legitimate reason to use an external image, this will need to be referenced appropriately All reference material should be cited correctly – plagiarism = no entry Hints: Pick a topic that is unique or hasn’t been written about too many times Paragraphs and photos make for easy reading Look at some of the frequently asked questions by newcomers for topic ideas The Prize: A portable RO unit, kindly donated to us by FSA.
 2 points
 -
Up for grabs is one awesome BossAquaria pack which consists of the following items: 1. 1 Shrimp Crack 2. 1 Baby Powder 3. 1 Snow 4. 1 Mineral Balls pack How to play - Each member can pick one number until the draw on the 24th December 2015 between 1 - 45. If there are extra number available closer to the draw date I will allow people to pick extra numbers. Once you pick your number for the day you can NOT edit your post. Any edited post will not be counted. I will advise the winner once the Powerball has been chosen on the 24th December 2015. To be eligible to play this competition you must have a minimum of 10 posts on the forum and based in Australia. Other moderators are eligible to play. Good Luck and Have Fun!2 points
-
So I put the tank together on Friday evening. Jumping the gun a little, I cleaned it early Saturday afternoon, and resealed it Saturday evening. It is now Sunday early arvo, The cure period isn't over yet, but I just want to flood it... If you want more pics, I posted an article on how to build a tank.2 points
-
2 points
-
A close call but @perplex takes it out by 1 vote. Send @ageofaquariums a PM to organise at your earliest convenience.2 points
-
 2 pointsmy crs tank is close to needing a cull, I've wanted to have a tank like this since i started looking in to shrimp. Crs every where! Haha2 points
 -
Congrats @keego you have got your self prize number 1. Very methodical way of picking I think. Good work. Prize #2 and #3 to go. Good Luck.2 points
-
 This took abit longer than expected and they didnt do what i wanted them to do but this will have to do :P And yes you can feel them picking away lol2 points
 -

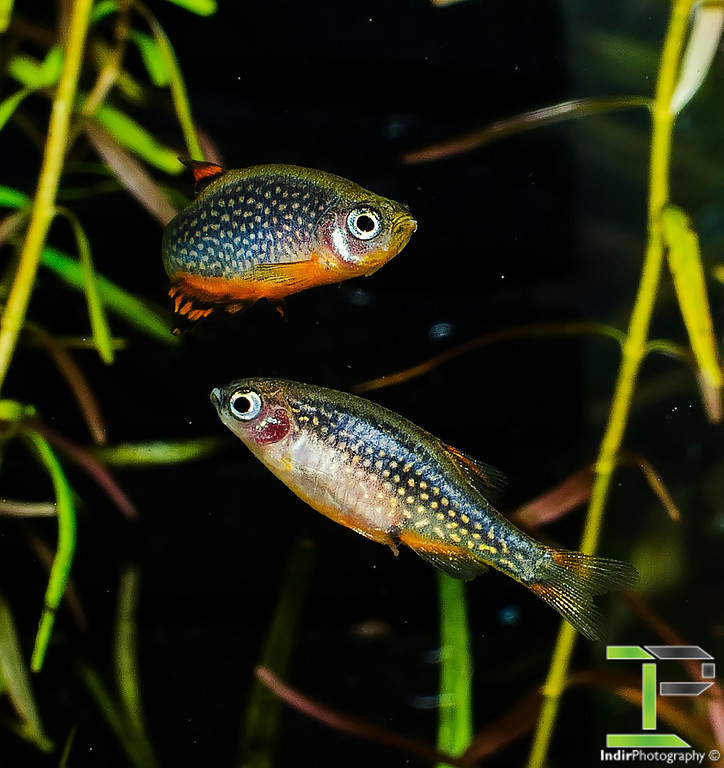 Breeding Celestial Pearl Danios (Also known as Galaxy Rasboras) Firstly I will start by saying that these are a fantastic little fish that show no aggression to any other species nor within their own species. Males will spar with each other sometimes and often display to females, no damage is ever done. They are shrimp friendly, but will take down shrimplets if they get hungry. So they can be added to a mature and established shrimp community tank to ensure maximum shrimp numbers surviving also. These fish prefer a nice planted tank with a dark substrate, this helps reduce skittishness and bring out their colour even better, it also gives refuge for fry that will pop up in the display tank! Feeding Celestial Pearl Danios will need to be fed small foods, due to their small mouth size. Though they are always excited to see live black worms (2-3 of these will make them VERY fat). Mine love grindal worms so they get this often, as well as baby brine shrimp and cyclops regularly. They will readily take dry foods of small size, I have had great success with Sera Vipagran Baby. To keep them in shape for breeding on a regular basis, I feed them twice a day with baby brine shrimp and a higher protein food like grindal worms, black worms, and so on. I find live high protein foods keep them in better shape and increase egg numbers. Sexing CPD Celestial Pearl Danios are fairly easy to sex, especially when they are of mature/breeding age. Females will have a much rounder body shape, when they are younger they will also have a taller body (older/more mature males develop this also, usually 6+ months old). Females also have a prominent black spot in front of the anal fin, the difference becomes more obvious as they mature more. Males are more slender in the body but will have much better colour in the body and fins, they develop a nice blue to purple colour to the body with nice orange fins and often the under belly too (the under belly colour can also be the case in females though, so isn’t a guarantee). In the below photos you will see the younger male has a slender body and orange under belly, as well as better colour than the female. However, as you can see in the older pair, the male has developed the deep body also and the female has a light orange hue to her under belly. The male in the second photo is a prime candidate for breeding as he is quite nicely coloured and has developed good body/fin shape and colour. Young Pair – Male on the bottom right and female on top left: Older/More Mature Pair – Male on top and female on bottom: Breeding Celestial Pearl Danios will start breeding from as young as 3 months old if fed well and have clean water throughout their short childhood. However, I find they are usually all mature by 4 months old. You will need at least one pair for breeding, however I have better experience breeding a trio as this gives females times to recover between breeding sessions as these fish are “constant” (usually daily) spawners. Spawning is induced by males, where they will hover over a specific area they like (moss, spawning mop, etc) and when a female is nearby they will begin to shake their bodies and flare their fins in hopes of attracting the female. They will do their dance and display, but the spawning comes when the male has his head pointed down and shakes, following the female behind closely. These fish will often spawn in a display tank and you will get fry popping up now and then in a well planted and mature tank. However, celestial pearl danios will readily eat their eggs and fry in my experience so this method will result in minimal fry numbers. There is another option which can work well if you have spare tanks, or enough room to rotate breeders. This method is basically using a bare tank with some java moss and keeping a trio in here for a 5 to 7 days, then moving them to another tank while the eggs hatch in the first tank. Then you keep repeating this process until you have enough fry or forever if you have the space… I have not tried this method myself, but have heard of others using this method with success. I personally don’t have the tank space for this method. The final method which has worked the best for me has been a dedicated breeding tank. In this tank all I have is a sponge filter and an acrylic yarn spawning mop (make sure it is 100% acrylic otherwise it will eventually rot in the tank). I keep a trio of my best fish in here, one male and two females. The male I use is the “older” pair from the photos above for his colour and body shape, as well as two nicely coloured and sized females. I call this the “permanent breeding factory”, because I am able to get on average 20 eggs per day with this method. To collect the eggs in the factory, I use a turkey baster purchased on eBay. I stop the sponge filter and after about 5 minutes or so when everything has settled down I slowly lift the spawning mop up and shake the mop, to make this easy I tied a long piece of yarn which comes out of the tank onto the lid for easy lifting without having to drop my arm into the tank. I then use a light on the front half of the tank, placing the light from the side helps in seeing the eggs easier as does a dark base (my tanks have black bottom panels). Using the turkey baster I suck the eggs up and collect them in a plastic cup for later use. With the eggs in the cup I then fill the cup most of the way and use an air stone on a very low bubble rate to keep circulation over the eggs to prevent fungus. Another option is to put the eggs in a fine meshed breeder box or poke some tiny holes into the cup and float it in the tank to keep fresh water circulating over the eggs. Eggs take about 3-4 days to hatch on average, and the fry will now be wrigglers which cannot really swim yet and are not ready to be fed. This wriggler stage will take about 3-5 days before they are free swimming. They will often be holding onto the side of the cup, or laying on the base. This is nothing to worry about. Once fry are free swimming they will be quite small and very thin in body thickness. You will need very small foods to have the best success, such as paramecium, spirulina powder, fry powder foods like sera micron and so on. I find that I get a MUCH better survival and growth rate when the fry are fed live foods so I only use paramecium for feeding them. The fry will need about 10-15 days before they can readily eat baby brine shrimp, I don’t bother with foods larger than paramecium until this stage mainly because micro worms and similar are a pain to keep going and requite too much maintenance. Once the fry are on baby brine shrimp, they will grow much quicker. Around the 5-6 week mark, I start introducing sera vipagran baby or similar small sized foods. I however prefer to give them live foods more than dry foods as I find the fry grow much quicker and are healthier and develop colour earlier. Fry will grow fairly quickly and at the 6 week mark will be around the 15mm mark and should be showing some slight purple/blue to the body and their golden spots should be readily visible. From this point on the fry will slow down their growth as they reach their adult size but colour will come in much quicker. By the 12 week mark the fish should be very close to looking like full grown adults, with the deep orange colour developing quickly after this point. Fish should also be reasonably easy to sex from this point on as the body shape has already developed and the colours are coming through quickly. Now I hope you enjoy the photos of the fry below, which should help you gauge age and so on of your fry! As a comparison, the first two photos are of fish the same age but the first shot is of a fry fed solely dry foods like spirulina powder and similar from hatch while the second photo is a fry fed on live foods from hatching. Young fry (most likely female) at 12 weeks old – Fed solely on dry foods from hatching. Young Female Fry at 12 weeks old – Fed on live foods, with dry food at the later stage in life Most likely a nice young female, but could be a male. Young pair of CPD, approximately 7-8 weeks old. Young female, approximately 7-8 weeks old Thank you for reading along and I hope you find the information useful, or at least enjoyed the article!1 point
 -
1 point
-
 Congrats to the winners so far @keego @kizshrimp, I will hold off shipping until all items won!! remember to get your guesses in!!1 point
 -
 1 pointI have been using the fans for 3 years now for my CRS tank and really haven't had an issue with the shrimp. I have shown the huge colony I had in the tank on another thread. The only reason I'm changing over is the fans look untidy during the summer. This last week here in Adelaide we have had 4 days over 40 degrees and the tank never went over 24 so it is possible to use fans on bigger tanks. I don't think I would recommend them on small tanks as the volume of water isn't big enough to stop large swings in temp but the larger tanks remain much more stable.1 point
 -
Here is my entry for this competition :) Breeding Celestial Pearl Danios Good luck to everyone entering!1 point
-
 1 pointSo I've been meaning to post for the last week about my experience with macropore, but life kept getting in the way! For anyone who comes across this thread in future, better late than never I figure. Step 1: checked my test kit by testing RO water at the same time. As you can see, the test kit was reading fine but my tank nitrates were through the roof. I added 375ml of macropore to my 440L tank last Sunday. I didn't have time to dismantle the filter (plus something always goes wrong and I end up dumping water all over the carpet), so I just hung it in my tank in front of the power head: After 24 hours, I did the first test. Nitrates were way down to 10-20 already. After 48 hours there wasn't a huge amount of difference, but it was closer to 10 than 20. After 48 hours I got bored of testing my nitrates every 24 hours. Jeez, do I hate that test kit. </rant> Ahem. So after 1 week, I managed to get the macropore into the filter (without too many accidents) and the results are great - looks like 10 to me :) Can't say that the shrimp look that much different yet - I don't know how they survived so long with such high nitrates (and don't get me started on the Ph), but for now it appears to be stable. Thanks everyone for the input!1 point
 -
1 pointApparently the 2213 can work well with a resun650. One of our members recently was telling me that was what he uses on his 3 ft tank. I did a bit of research and ended up getting the resun 650 for my 210 litre tank . We have sponsors here that sell chillers so we can't give you any external links of where else you can buy chillers but you do get a discount for being a member if you use our sponsors. Most of the chillers are now all made in China anyway. I have been keeping my 210 litre cool with 4 computer fans linked to a temperature controller. The tank is in the house but we only have evaporative cooling for the house aircon - except in my shrimp room they have refrigerated aircon but the 210 is in another room- however the fans have kept the water below 24 even with the 44 c temp that we have had here in Adelaide this week . I haven't connected the chiller yet as I'm waiting for some taps to come so can't say how much better a chiller is but I'm sure it will be worth it once it's finally connected.1 point
-
 1 pointThanks guys. Nogi has got my first lot of culls but I'm sure I'll have some more soon.1 point
 -
It didn't have to come down to it, he had the votes anyway.1 point
-
Aww bugger the Co2 is goneeeeeeeeeeee :P1 point
-
1 pointif the quality was there i'd agree with you but there are lots that aren't up to my color standards. i culled 3 males (as a start) from this tank and 3 blond tiger males from the orange eye tank. i have some pics on the dslr that i need to get off now that i think about it!. i found a nice dark baby tiger as well when i was watching them I've seen a prl/crs pair that has prompted me to put my breeding box's to use! so ill be isolating them soon to hopefully produce some nice bubs, the only issue is shes dropped heaps of eggs from the last couple of times berried.1 point
-
sorry @FMuscle thanks for the comp and thanks @ageofaquariums1 point
-
1 point
-
Wow that's so cool and detailed. Looking forward to what others post as well.1 point
-
1 point
-
1 point
-
1 point
-
 I forgot to add thanks heaps to newbreed for putting up these items and perplex if you win the net I'll do a swap with ya lol1 point
 -
1 point
-
 E8 pls let it be substrate hehe love your work newbreed :-)1 point
 -
Mint cheers iv been experimenting with making my own lol1 point
-
1 pointTry polyfoam.com.au product code E-50-2 or phone foamex and mention the same code. They don't advertise they have them but if you ask then they will get their equivalent. I tried emailing but they didn't answer any of them. Polyfoam and foamex are in most states.1 point
-
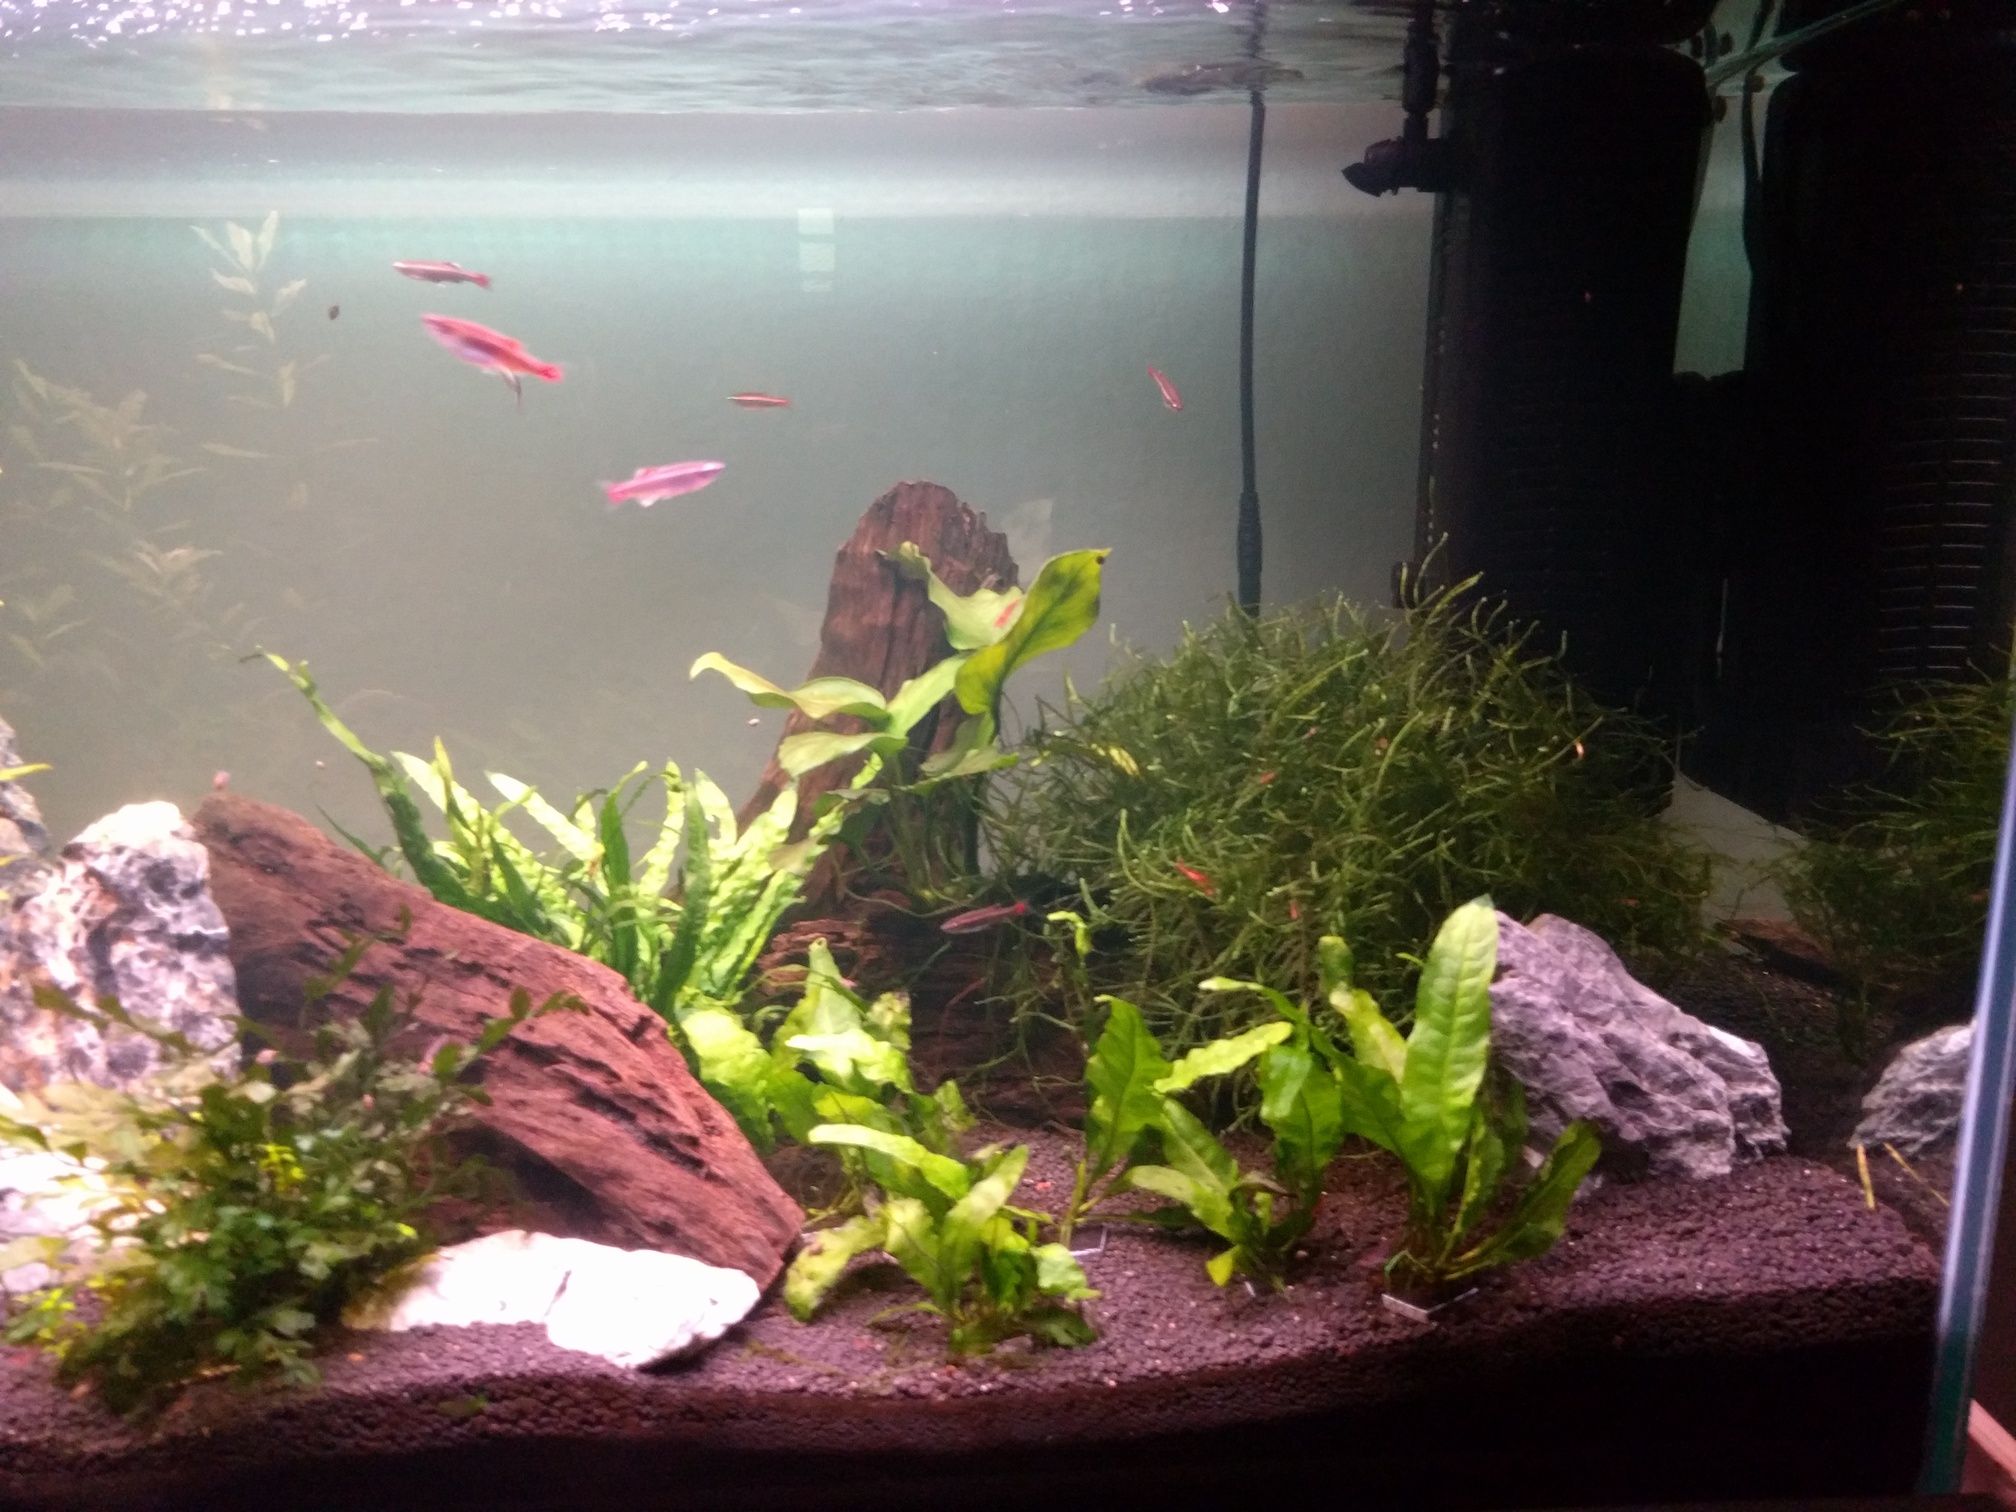
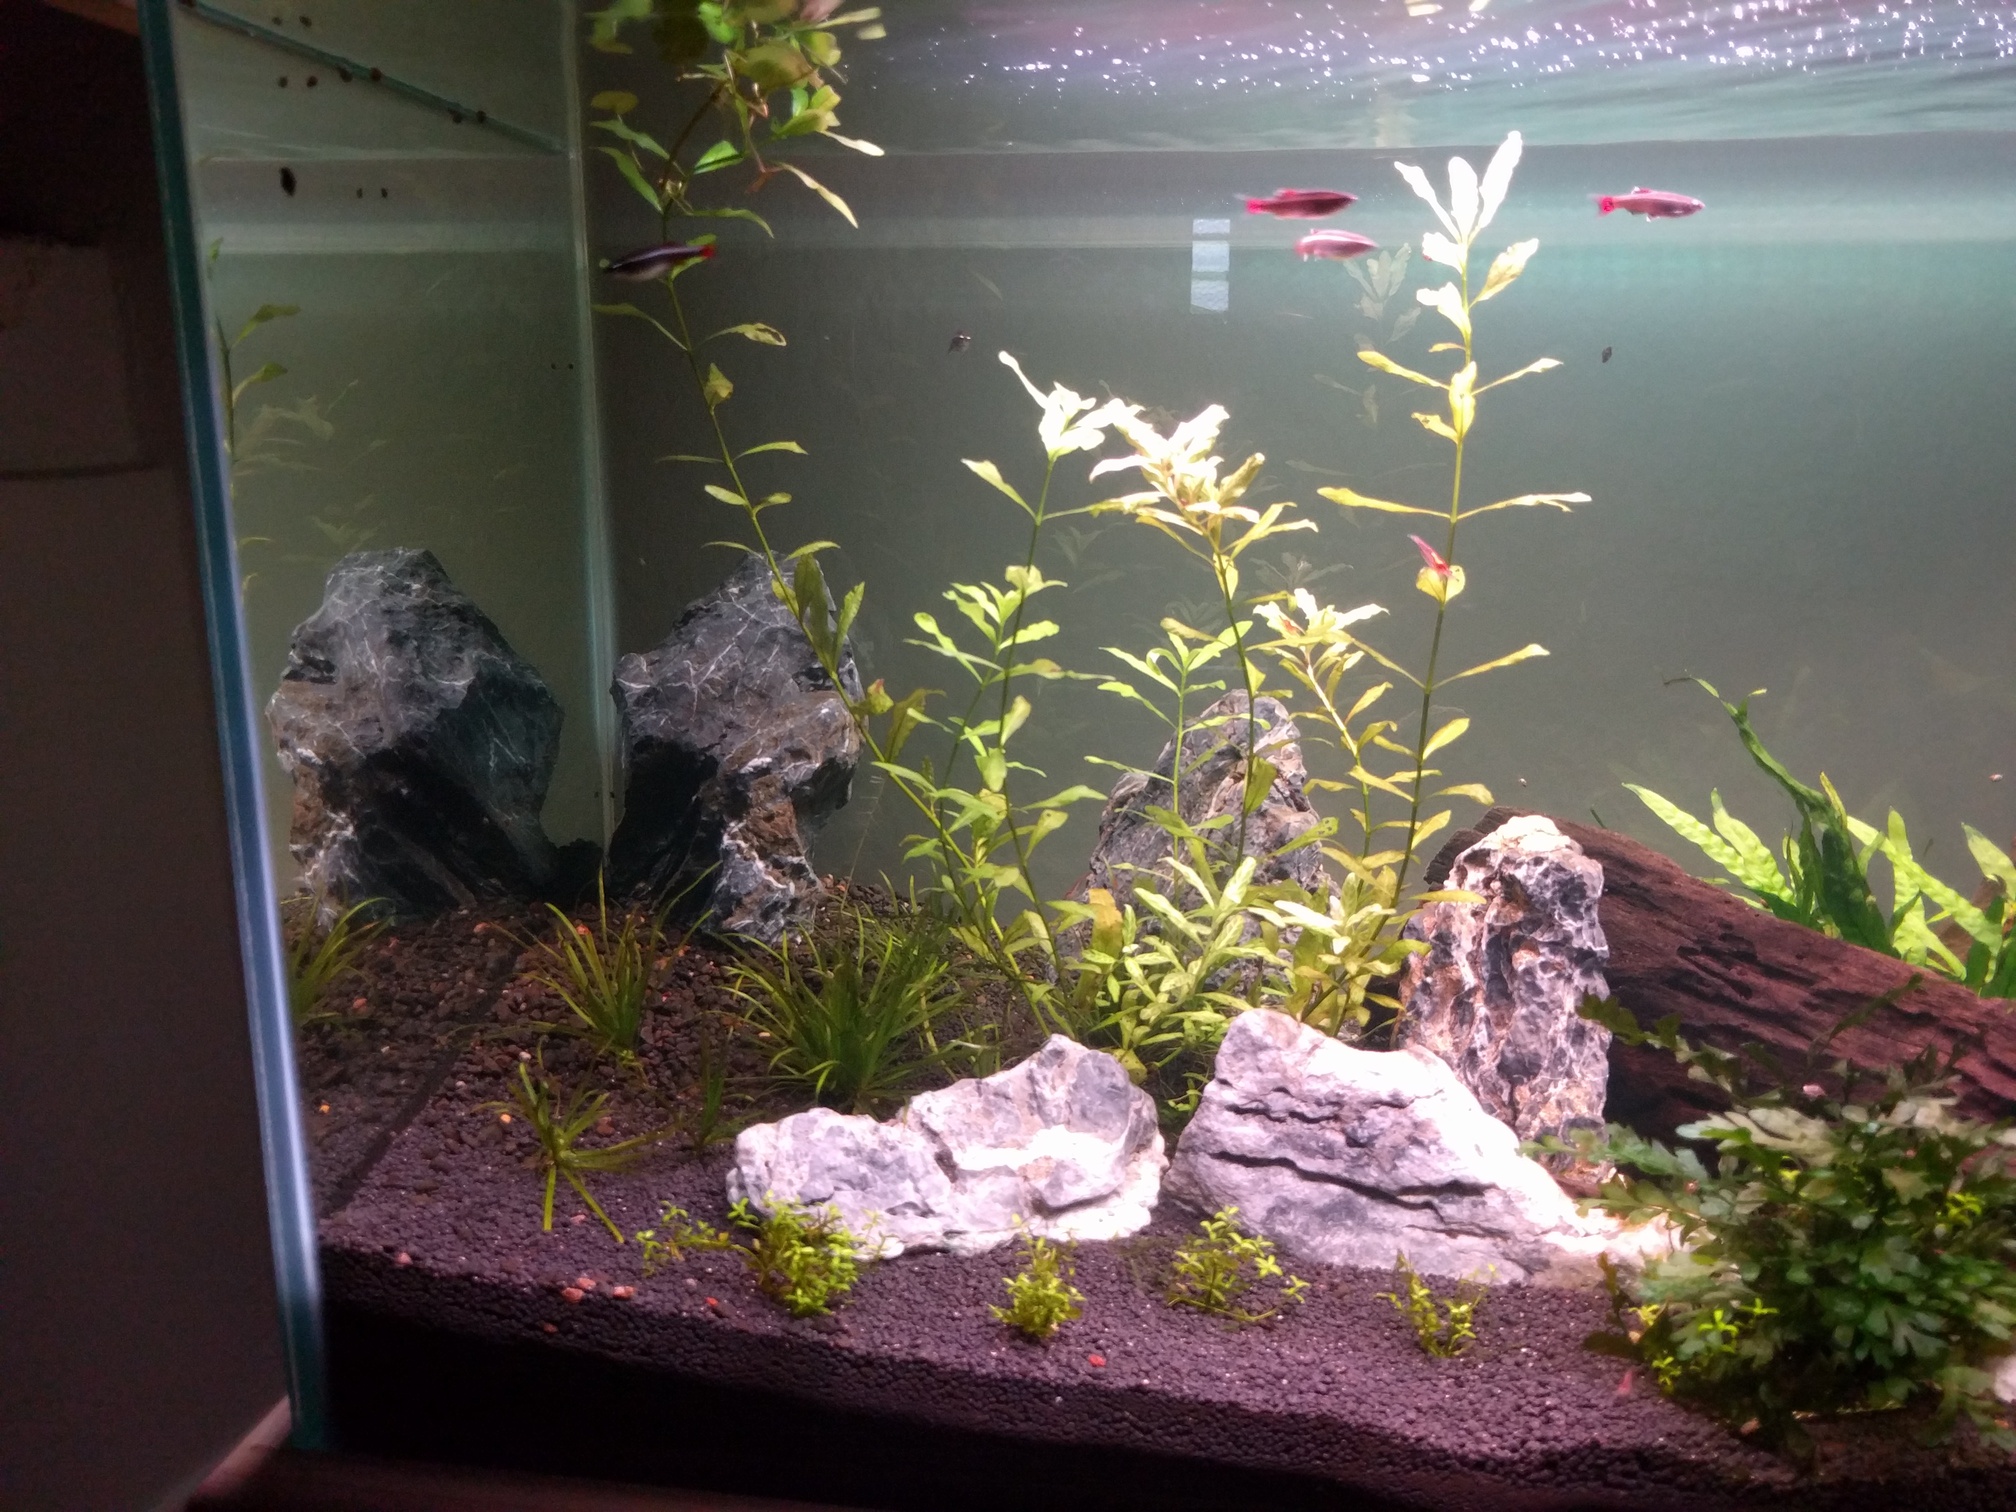
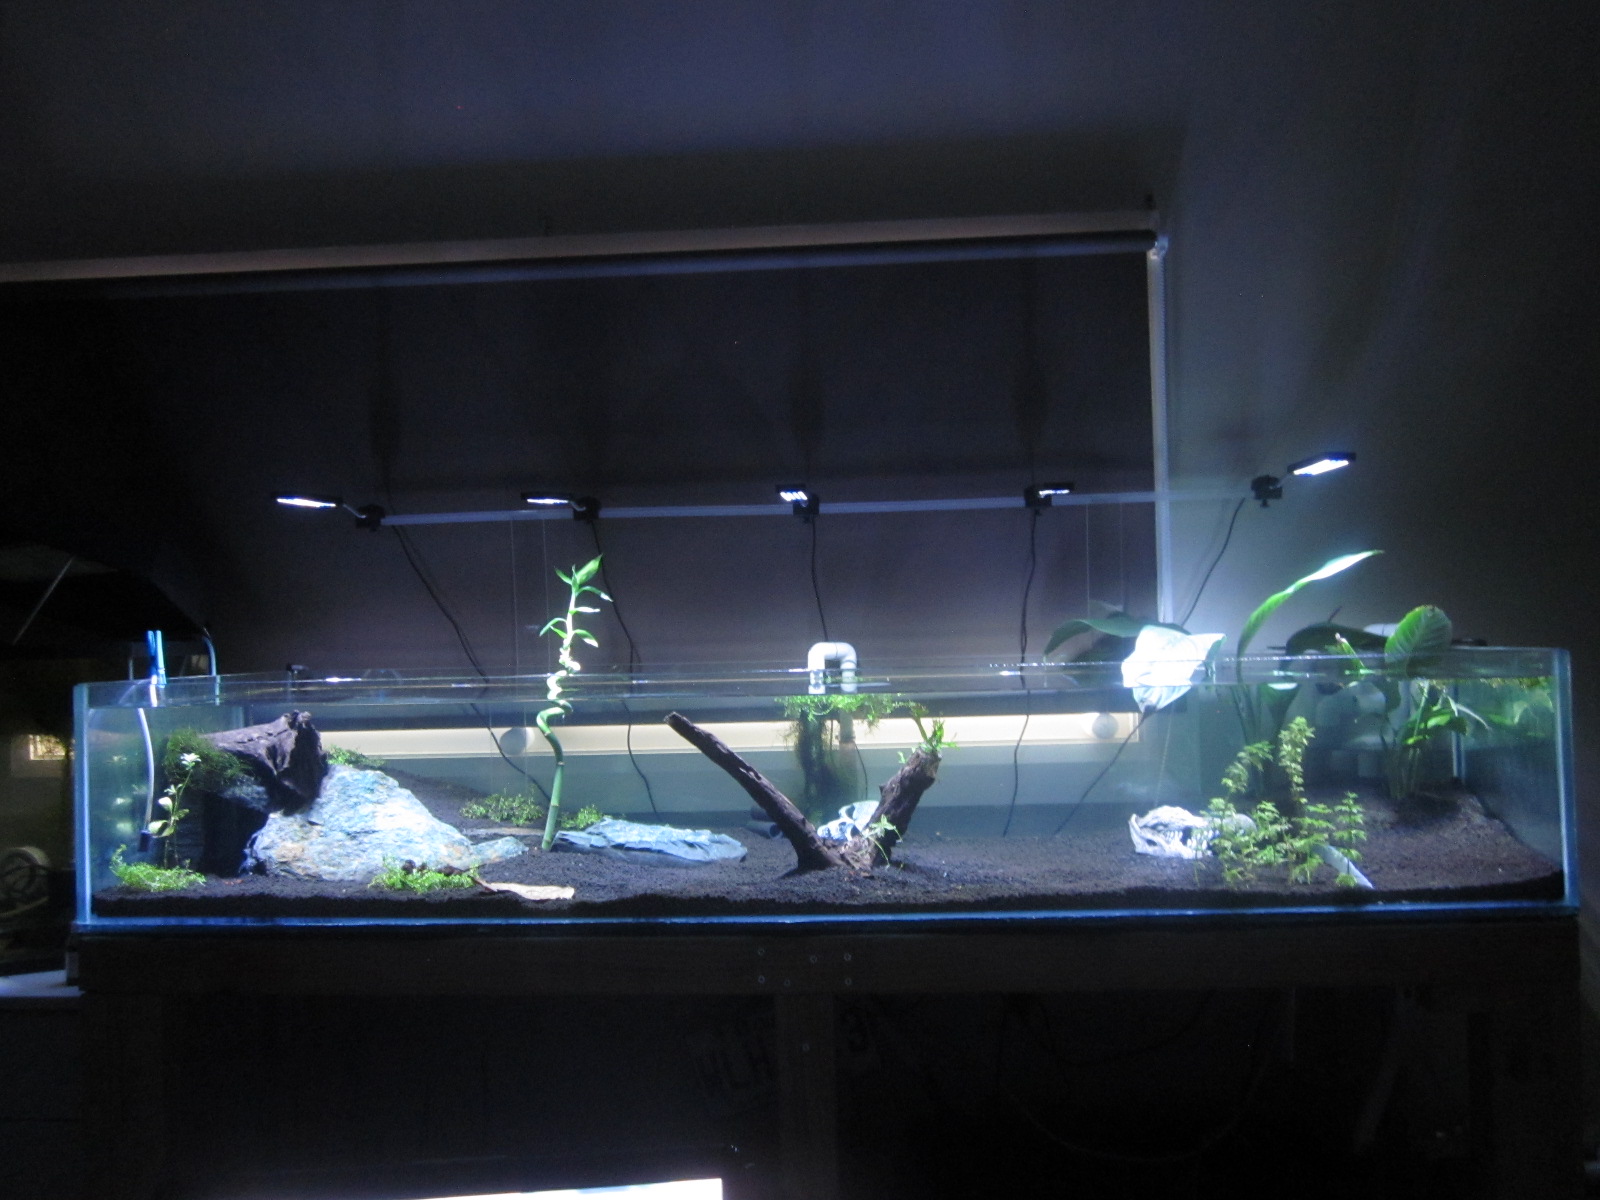
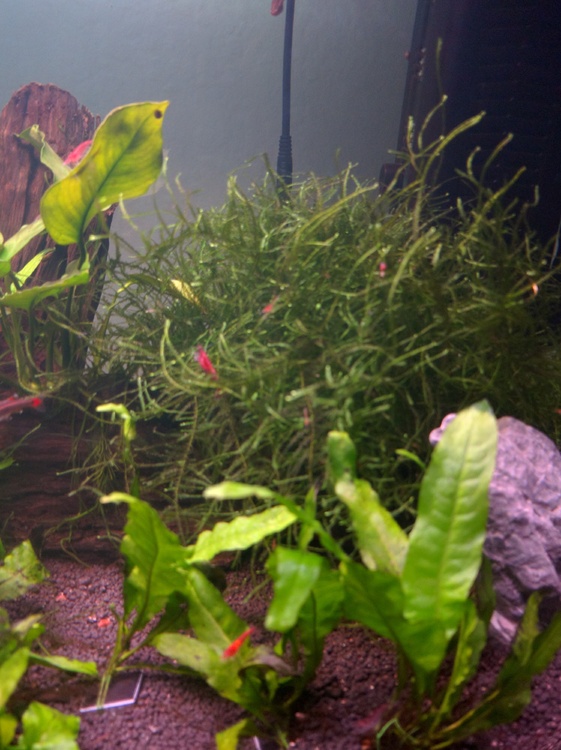
 1 pointFull tank shot... Taken and uploaded from my phone. Full tank shot... Taken and uploaded from my phone. And a few more close ups of each side

 1 point