Leaderboard
-
fishmosy
Members5Points4594Posts -

Squiggle
Members3Points10433Posts -

OzShrimp
Members3Points4102Posts -

kizshrimp
Members2Points506Posts
Popular Content
Showing content with the highest reputation on 02/01/15 in all areas
-
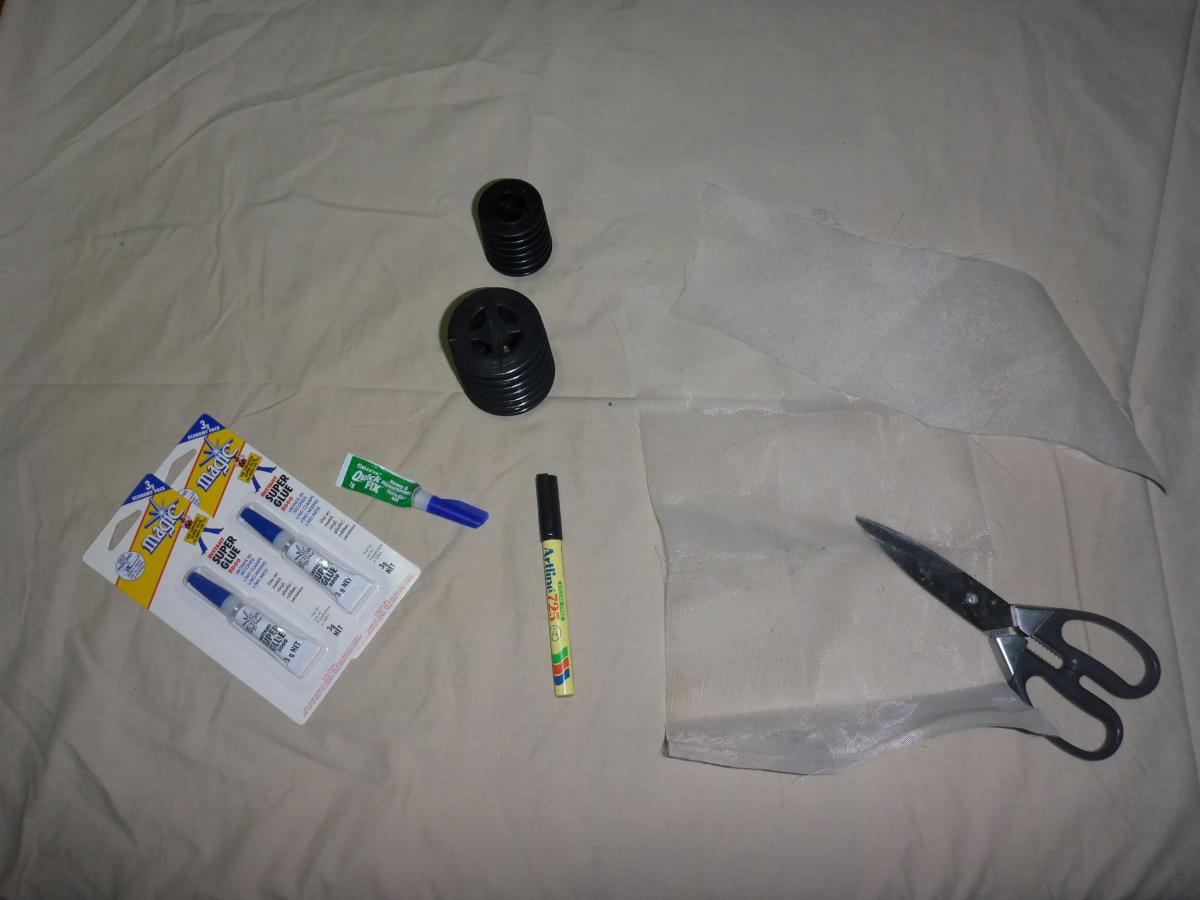
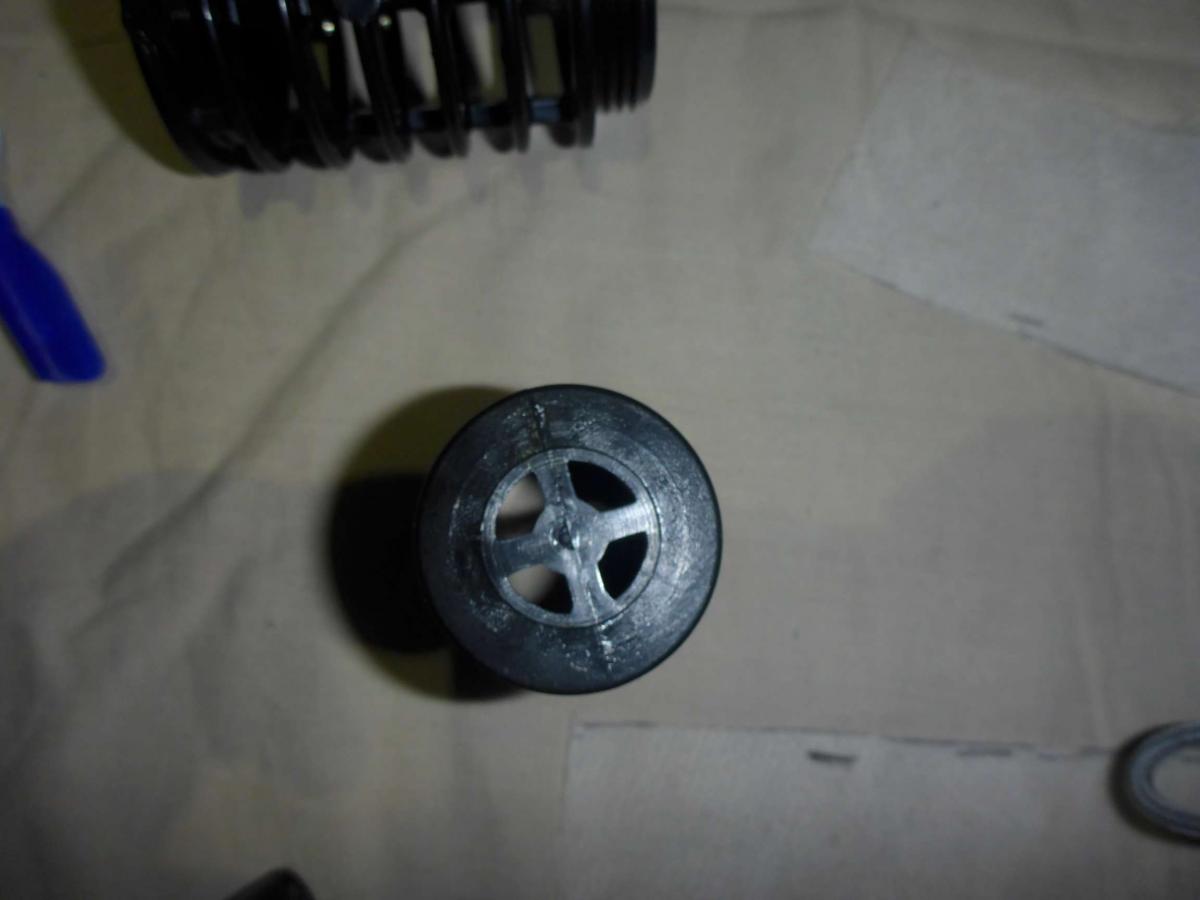
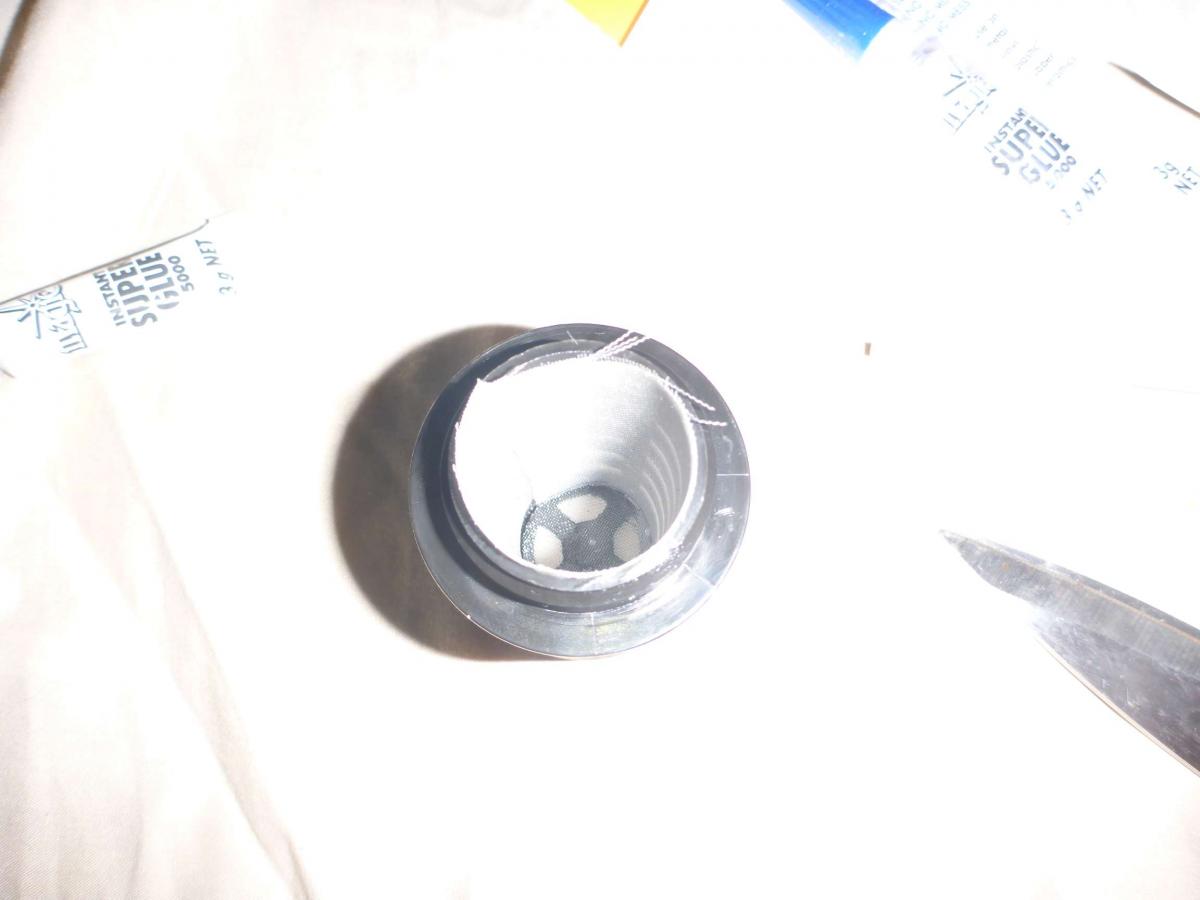
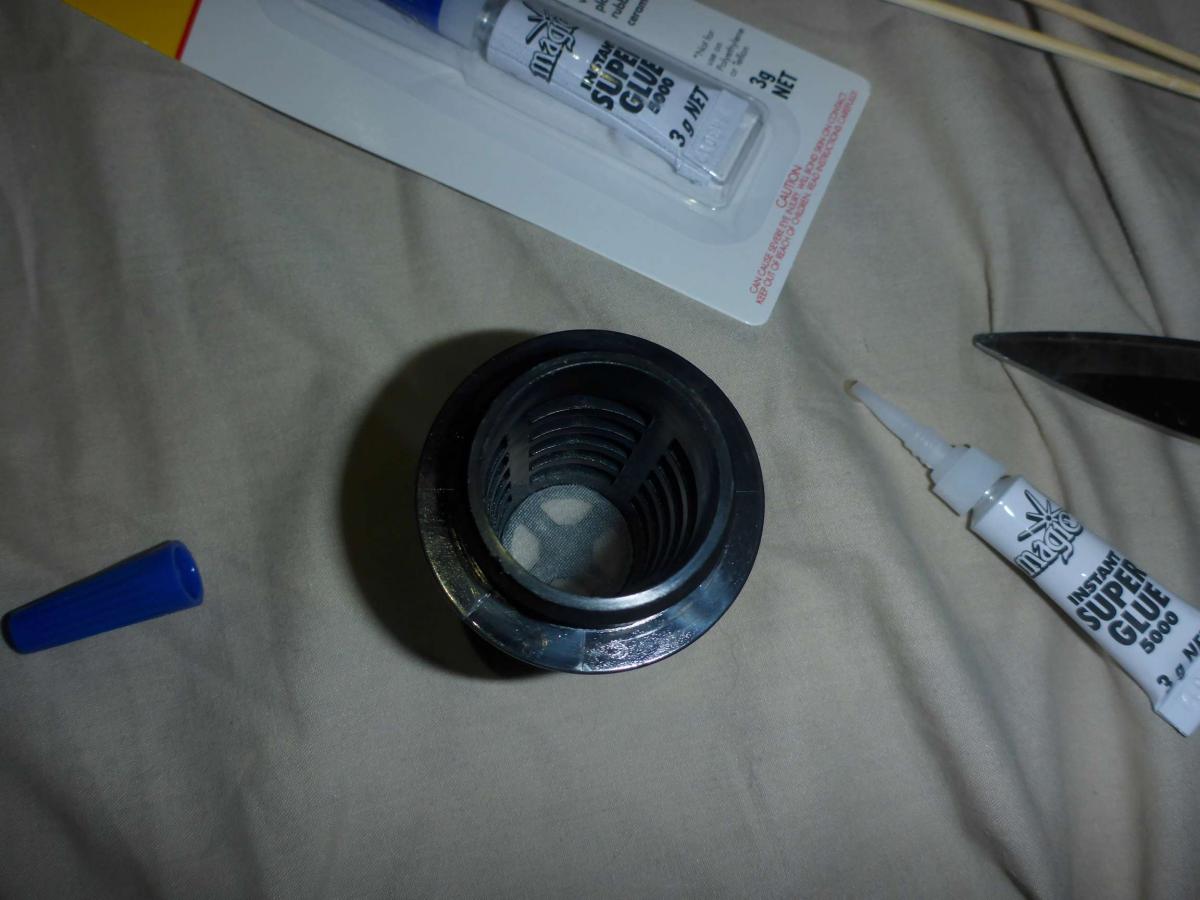
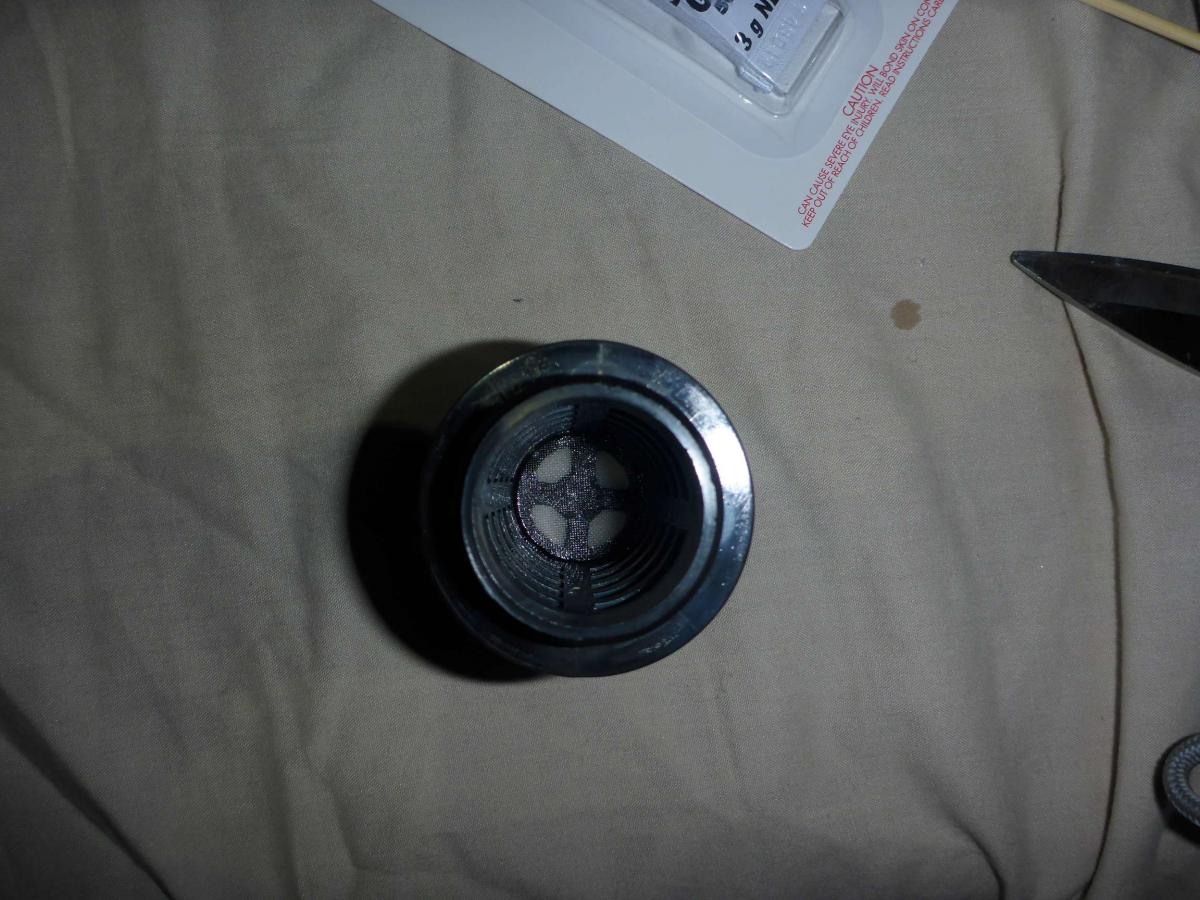
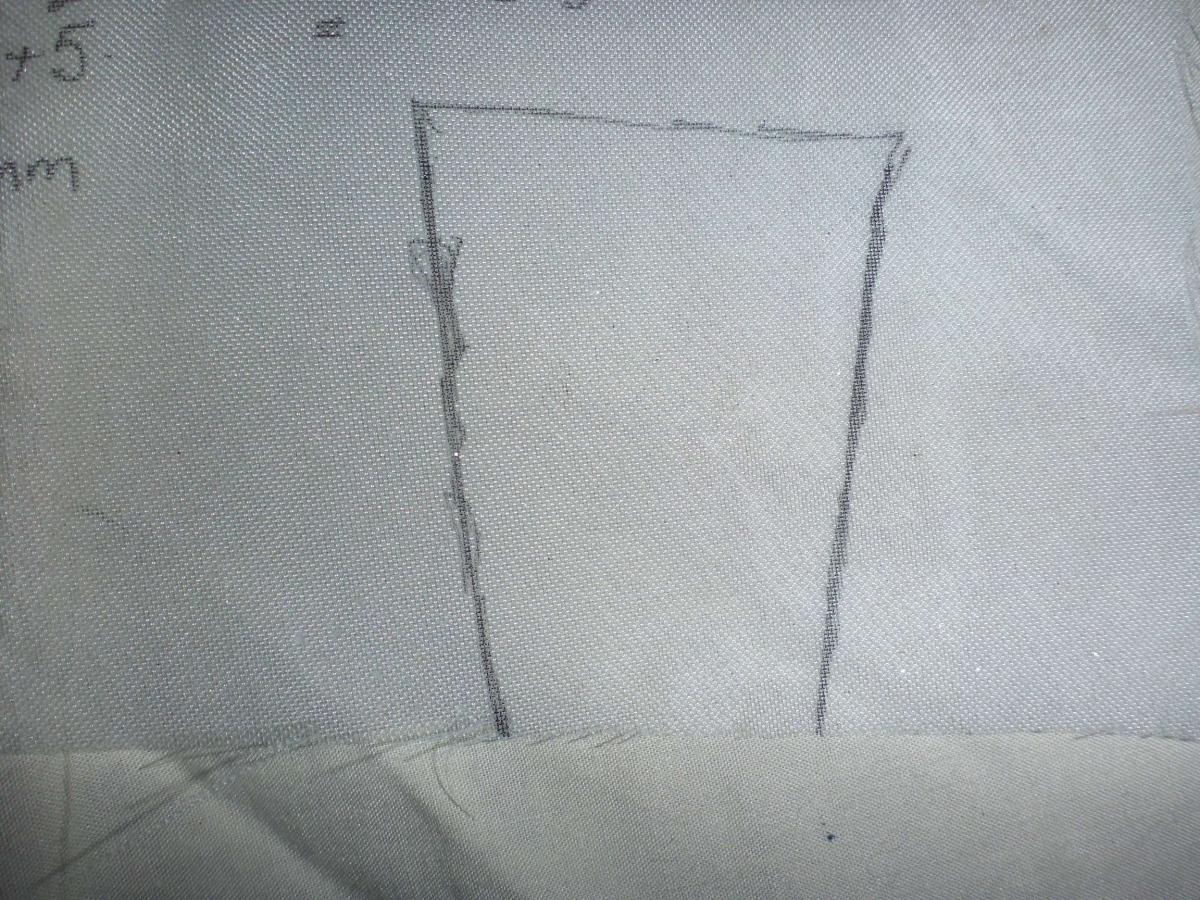
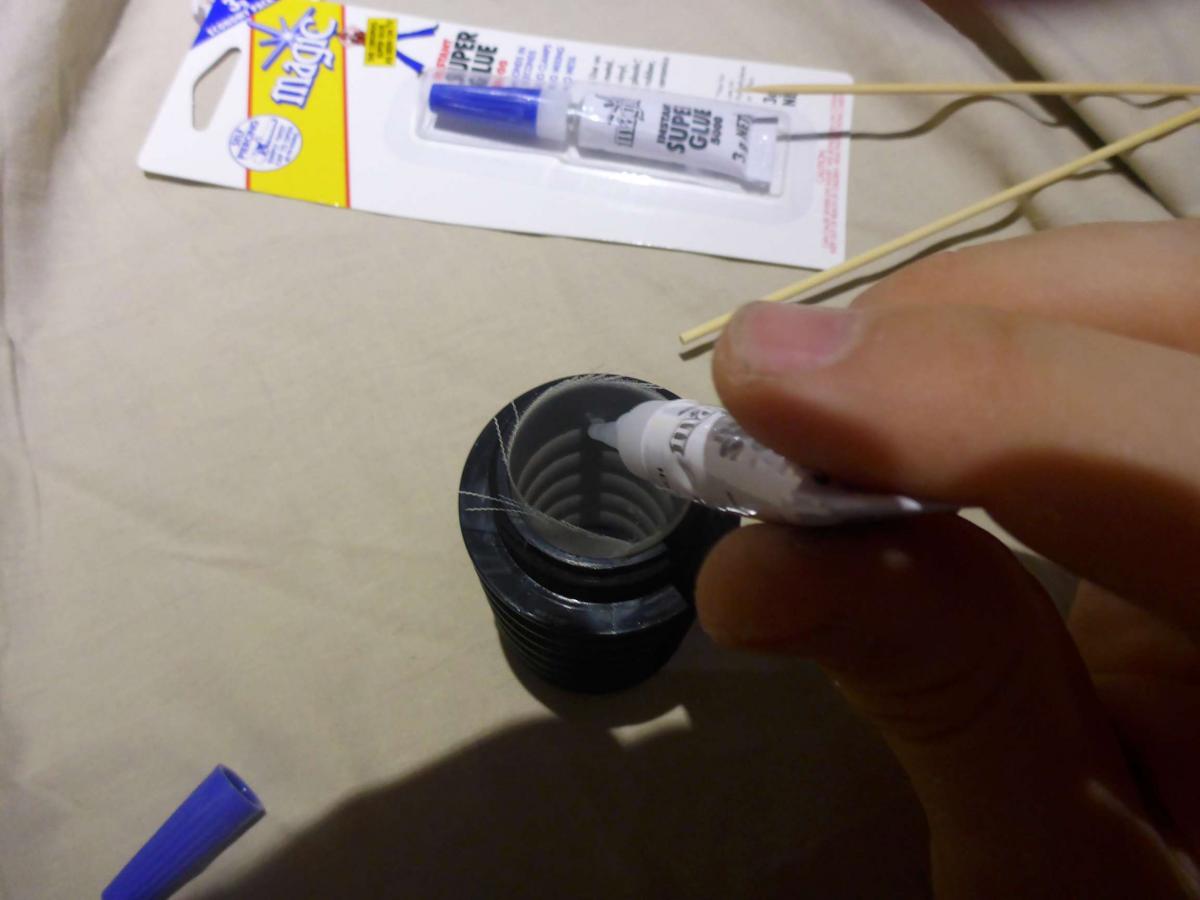
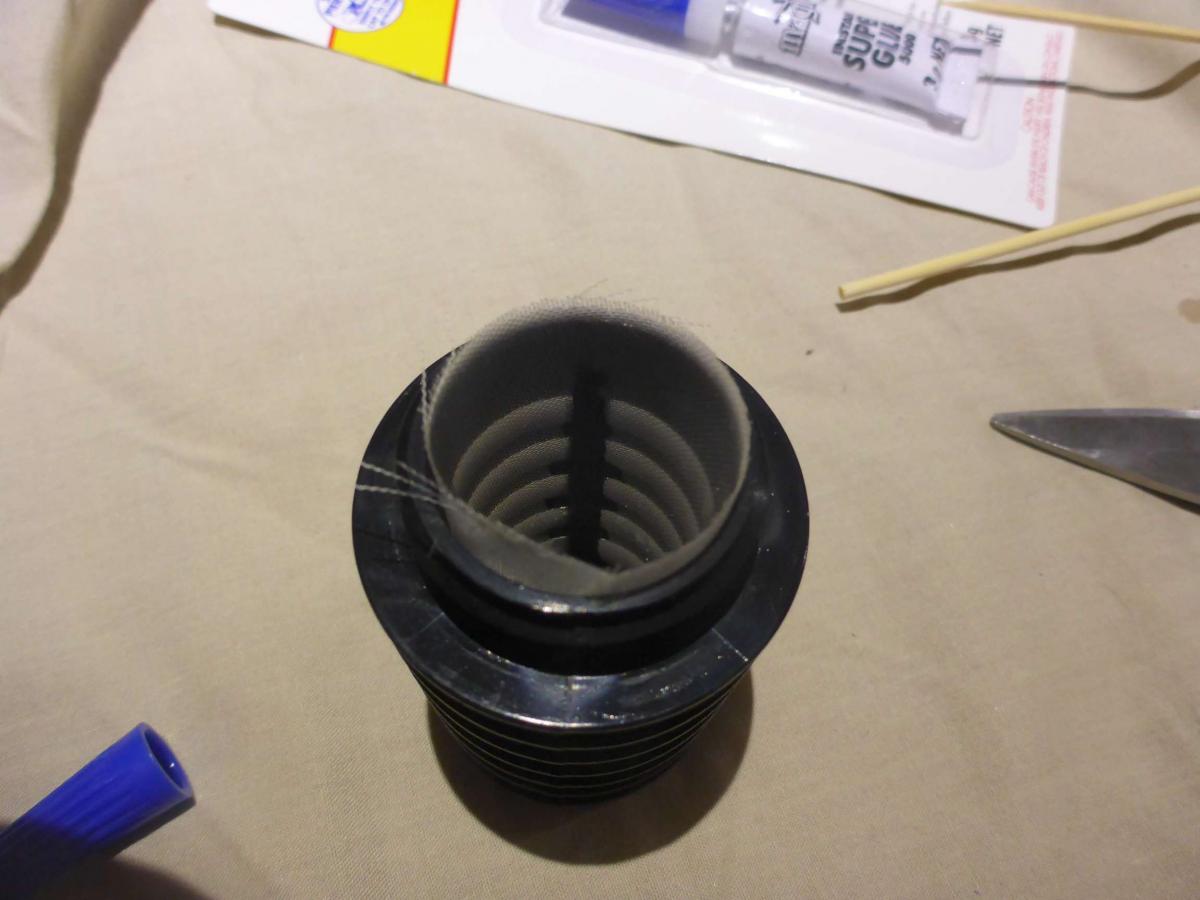
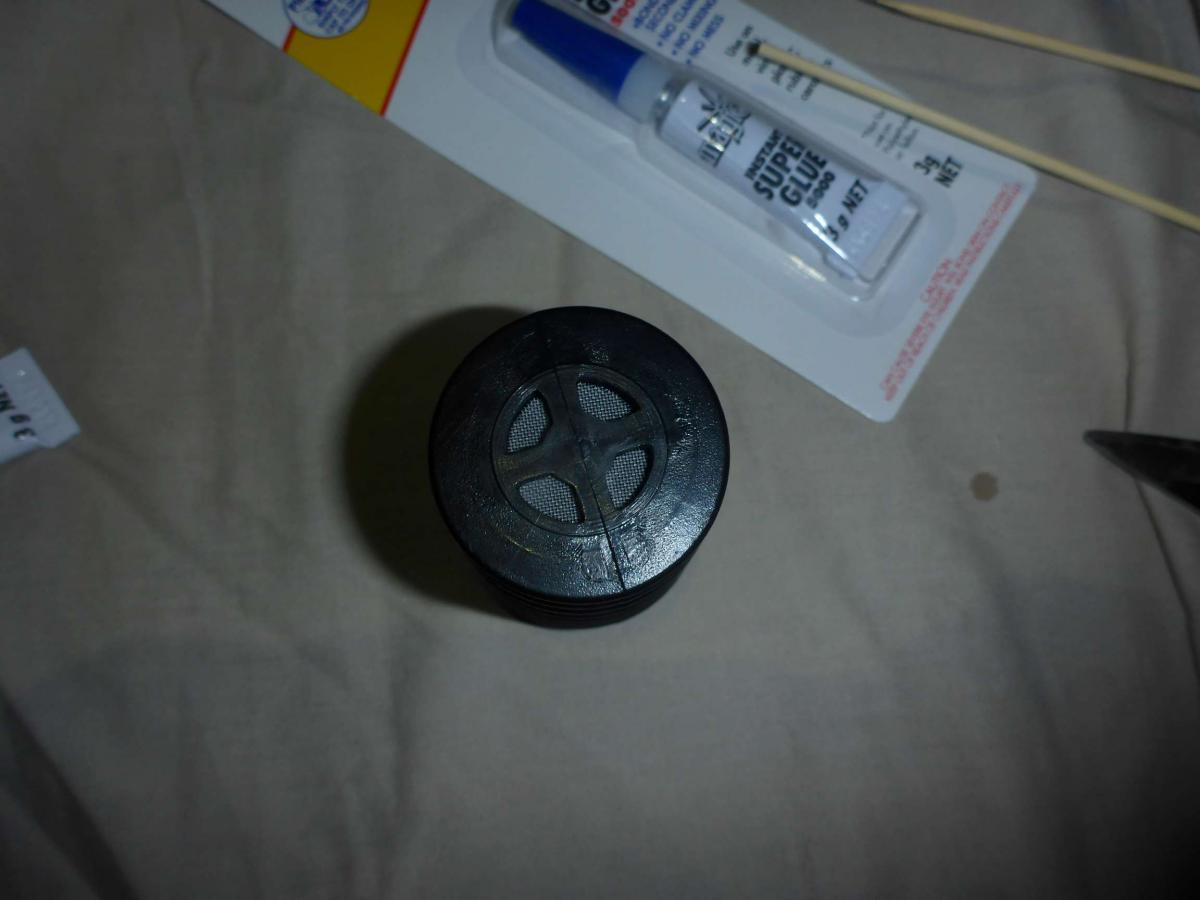
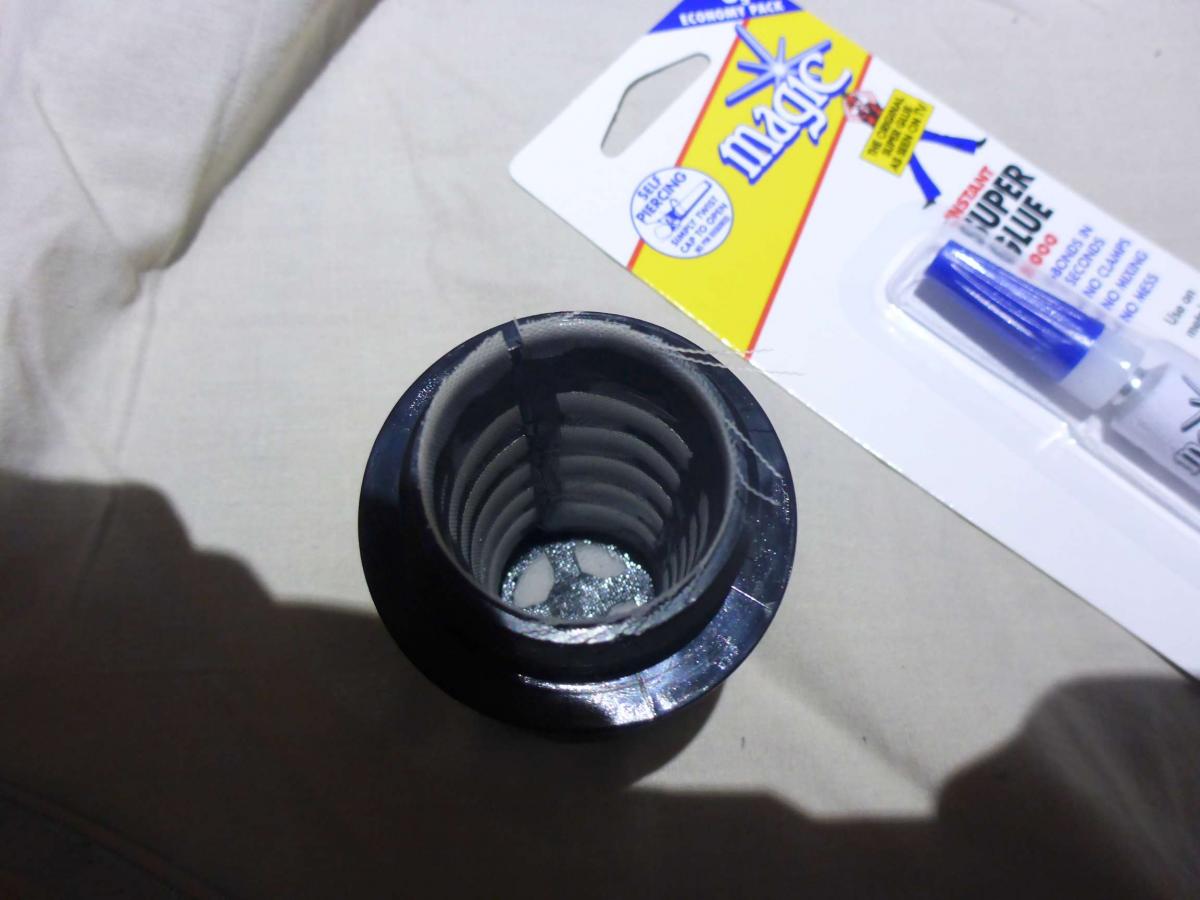
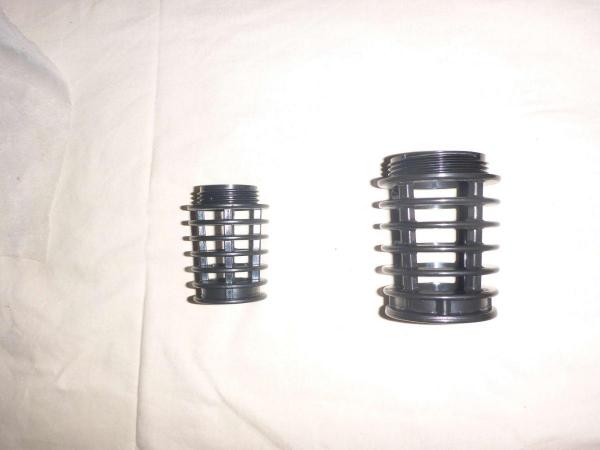
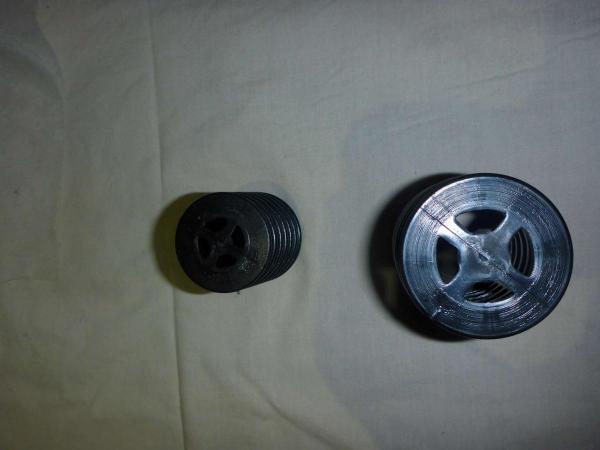
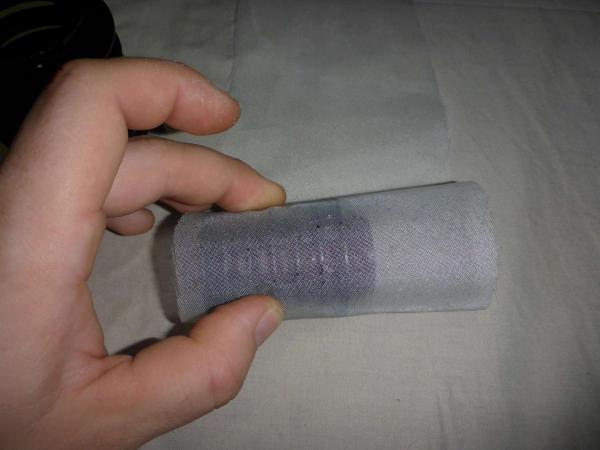
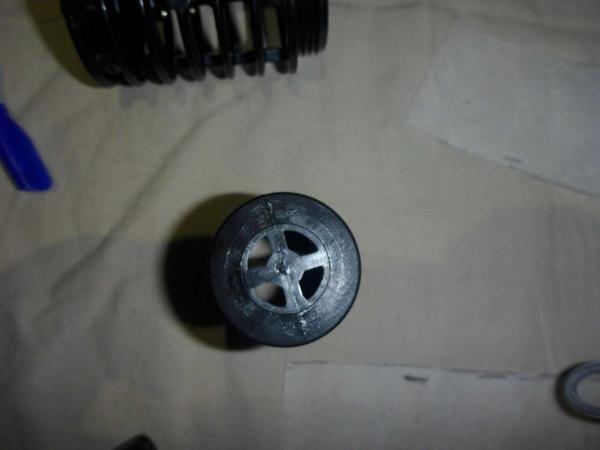
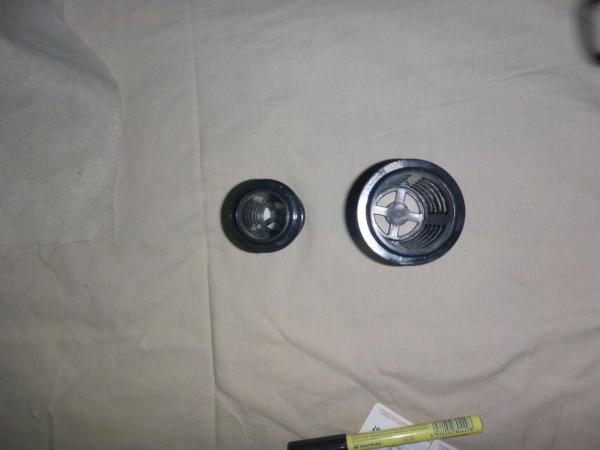
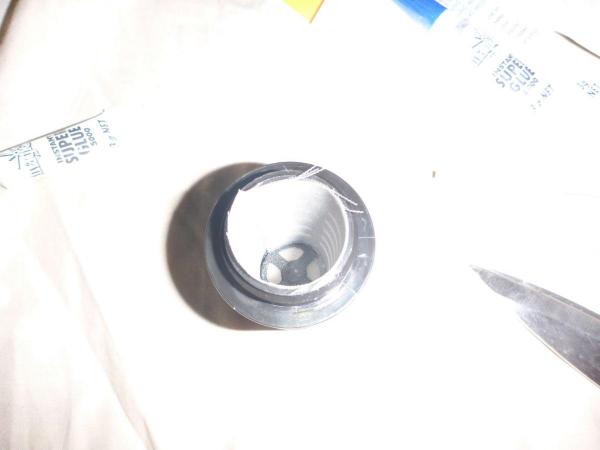
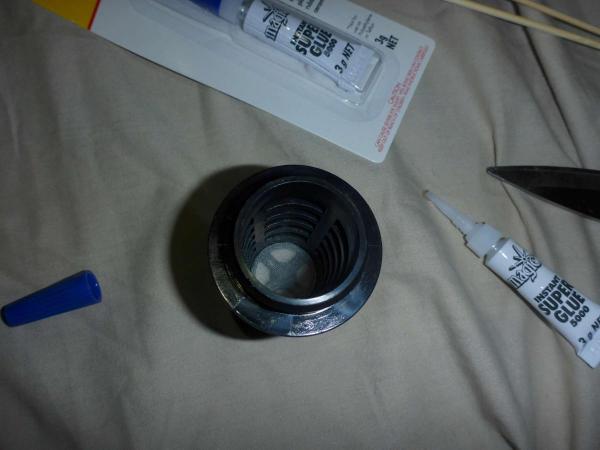
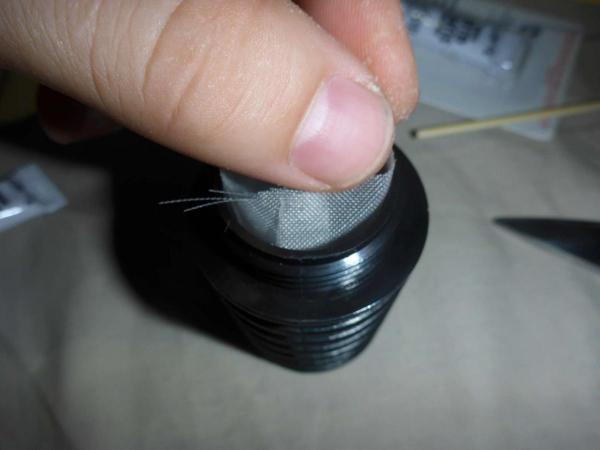
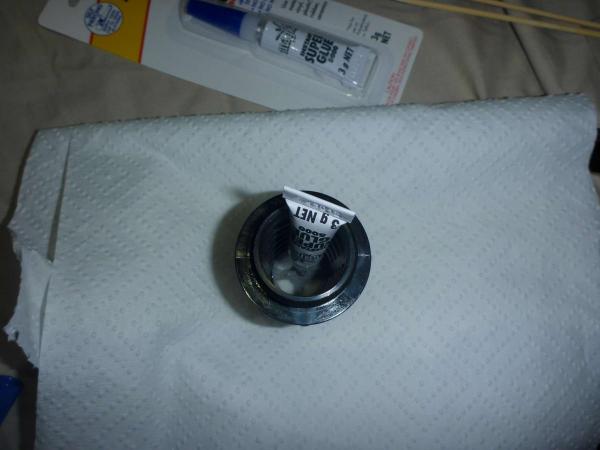
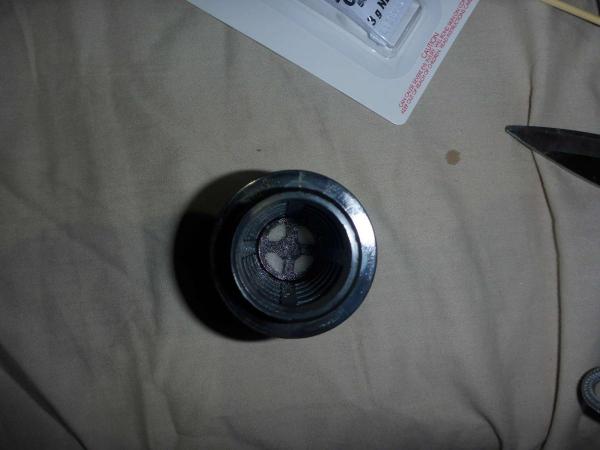
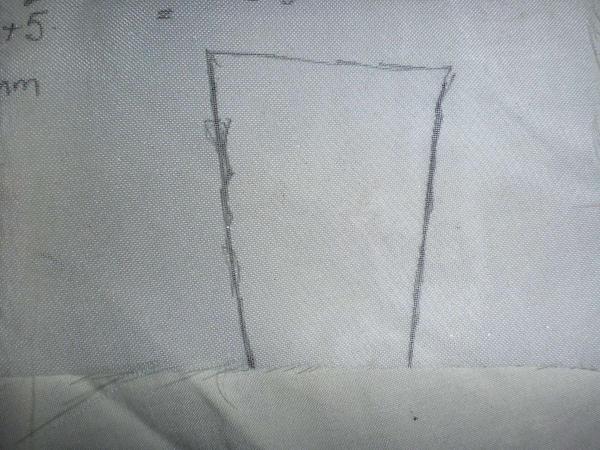
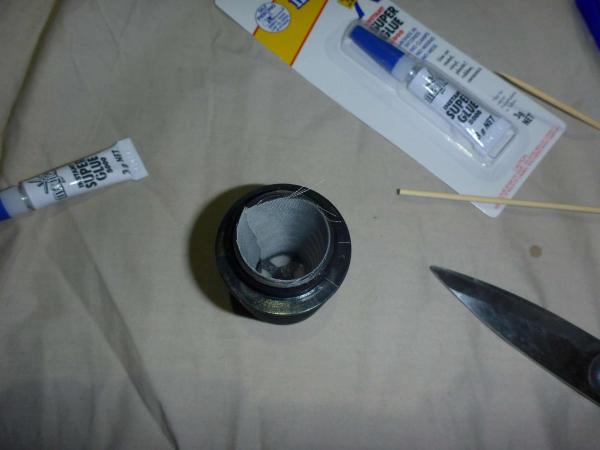
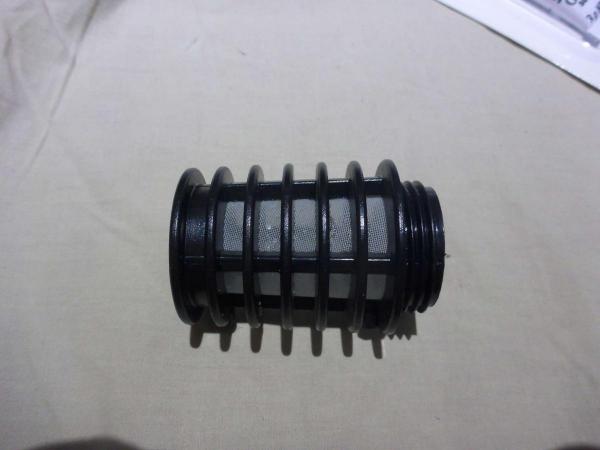
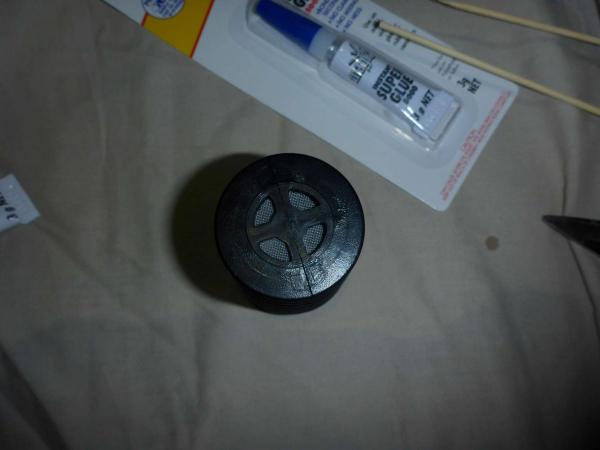
3 pointsSo here is my long awaited guide to making your own overflows. So, what you need: - Superglue - the liquid type is best in this situation, but you could use the gel type. - Marker pen - Scissors - mesh - more on that in a sec - Shroud - more on that in a sec A razor blade may also be handy for making the final incisions to tidy everything up, but forgot to include that in this shot. The mesh: There are several important things to consider when selecting your mesh (or the size of your mesh). How big are the shrimp you are keeping? There is no point in trying to use a 50 micron mesh for CRS as the babies are unlikely to fit through 250 micron. (micron refers to micrometres, or a millimetre divided by 1000. So 250 micron is one quarter of a millimetre). Remember smaller meshes will clog quicker so will need to be watched closely. Flyscreen is usually 1-2mm and nylon, so suitable for use as a screen for adult shrimps. Flyscreen is definitely not recommended if you want to stop shrimplets escaping out your overflows and (likely) into your pumps (often fatal). Above: 500 micron and 250 micron mesh respectively. For this example, I'll be using 250 micron screen. I've found 500 micron to be suitable for CRS and RCS, but 250 micron seems to be better for natives such as chameleons, which seem to have smaller shrimplets. So I have been using 250 micron screens on most of my tanks. I do find however that the screens need to be cleaned at least once a month to prevent buildup of algae, detritus, ect. If you use a nylon screen/mesh, you can use bleach/chlorine as a cleaner, 20ppm is an appropriate amount, but DO NOT LEAVE FOR MORE THAN 24 HRS as bleach seems to breakdown nylon screens if left for longer periods. If you have a buildup of salts or carbonates that can't be removed by chlorine, try a soaking in weak acid solution (after a rinse as acid and bleach react to form deadly fumes). Of course, remember to rinse your screens well before returning it to a tank filled with shrimp! The Shroud: It is just as important to consider the shroud that you use as it is to consider what mesh. The shroud must have enough open space to maximize the surface area available for the mesh. Less openings means less mesh, so the mesh clogs quicker. And clogged mesh can mean overflows, pump burnouts, angry partners, insurance claims, ect. ect. If in doubt, go bigger. The type that I most like (pictured below) are suited to screwing into bulkheads (which I prefer to use in any aquarium system) and have a good amount of open area but also plenty of area to glue the mesh to. I think you can get these at the two big hardware stores, but I get mine from a local irrigation shop for $3-8 depending on size. Here are two sizes, I believe they are 1.25 inch and 2 inches respectively. I'll be using the smaller size. The Process: The most important trick to this DIY is the use of liquid superglue. Mesh (being mesh) has holes, so liquids flow through it, including liquid glues. Here we use this obvious fact to our advantage. There are two ways of attaching the mesh to the shrouds. The first is to simply wrap the shroud in the mesh, add the superglue and trim when dry. The advantage of this method is that it maximizes the amount of surface area for the mesh to let water through = slower clogging. However I don't think it looks anywhere near as nice. So method two adds the mesh to the interior of the shroud. Step one: Cut a circle of mesh to cover the holes in the end of the shroud. On the end of the shroud is some casting marks. The inner circle is a good approximation for the internal diameter. Drop the mesh in. Then add the superglue only to areas where the mesh and shroud meet. If you don't add too much glue at one time, it will tend to flow only where the shroud and mesh meet i.e. where you want it. Step two: Cut the mesh for the side holes. Because the shroud is larger at the outflow end, the shape of the mesh needs to look like this: There are online tools that can help you find out the dimensions of your mesh by knowing the diameter or radius of the circles at the top and bottom of the overflow, which will give circumference (which are the top and bottom lengths of the trapezoid shape above respectively), as well as the height. However always leave extra as its easy to cut more mesh away, but very hard to join little bits on. I avoid the maths by wrapping the shroud in the mesh, trimming to get an oversize rectangle, and then carefully trimming down from there. However, this method does result in a bit more of the mesh ending up as offcuts. Add the mesh to the shroud and ensure it fits without too much of an overlap. Remember a double thickness of mesh (the overlap) will clog quicker. A 5mm overlap is plenty strong enough. So here I had to trim the mesh again as the overlap was much greater at the bottom than at the top. You'll have to look closely to see it. Once it fits in nicely, add the superglue only to the sections where the mesh and shroud touch. Here gravity is your friend as glue added to the top will flow vertically down the spine of the shroud without moving sideways into the mesh further than where the two touch. Step Three: Once all the areas where the shroud and mesh touch are done, leave it to dry (overnight), and then a final trim to remove the excess mesh. Step Four: Enjoy your DIY overflow that will never corrode.


 3 points
 -
1 pointI've been working towards this for a while now & some interesting results have come from it. Introducing the Skunk Head Pinto! I only have about 5 of these at the moment but I will be separating them to line breed & hopefull in a few (dozen) generations I will have them breeding true.1 point
-
1 pointAdded my DIY article here http://shrimpkeepersforum.com/forum/index.php/topic/8372-diy-overflow/ I'm sorry that its taken so long to get done everyone.1 point
-
 1 point
 -
1 point
-
1 pointYup but i have over filtration, currently i run a dual sponge filter, single sponge filter, 1250 canister filter running into a 800ltr canister, home made nitrate filter.. The 800 canister only has seachem matrix in it so big bacteria home which i dont need to touch, the 1250 has seachem matrix and filter wool.1 point
-
1 point
-
 Looks like it's going well man! Hope you've got some scissors ready for when that peacock moss goes bananas haha1 point
 -
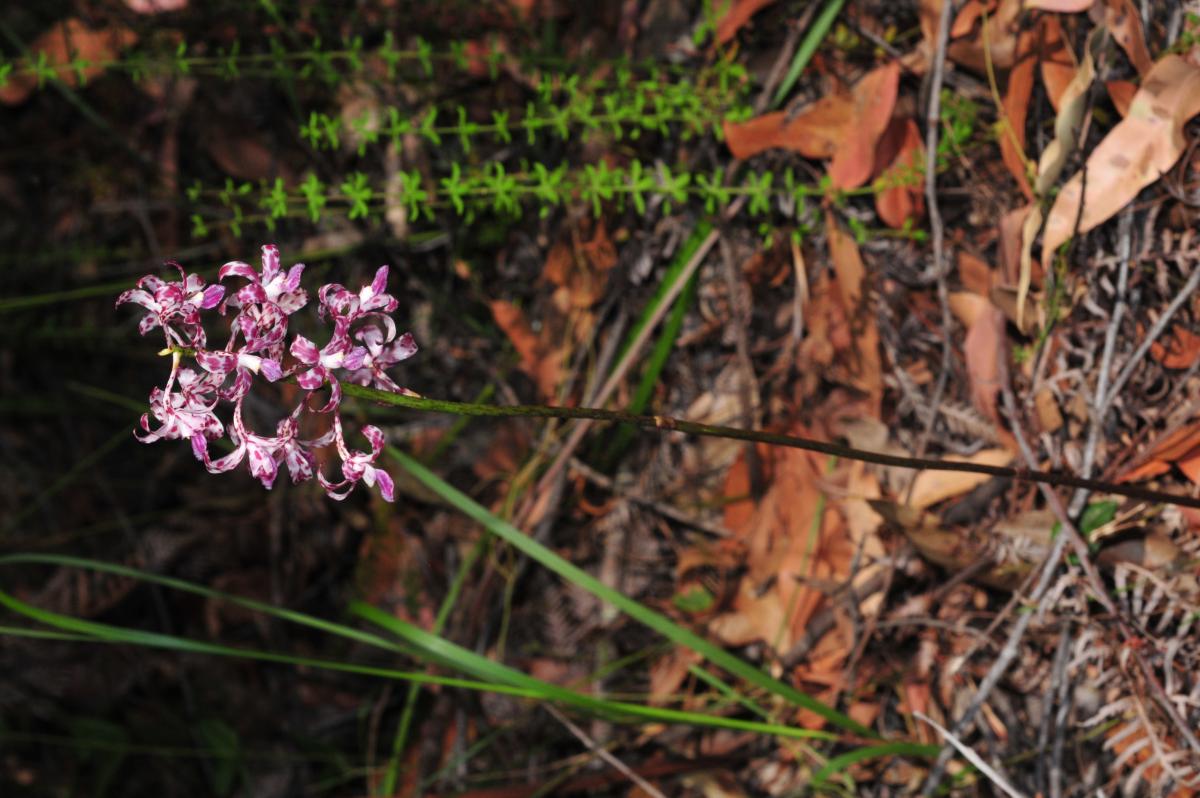
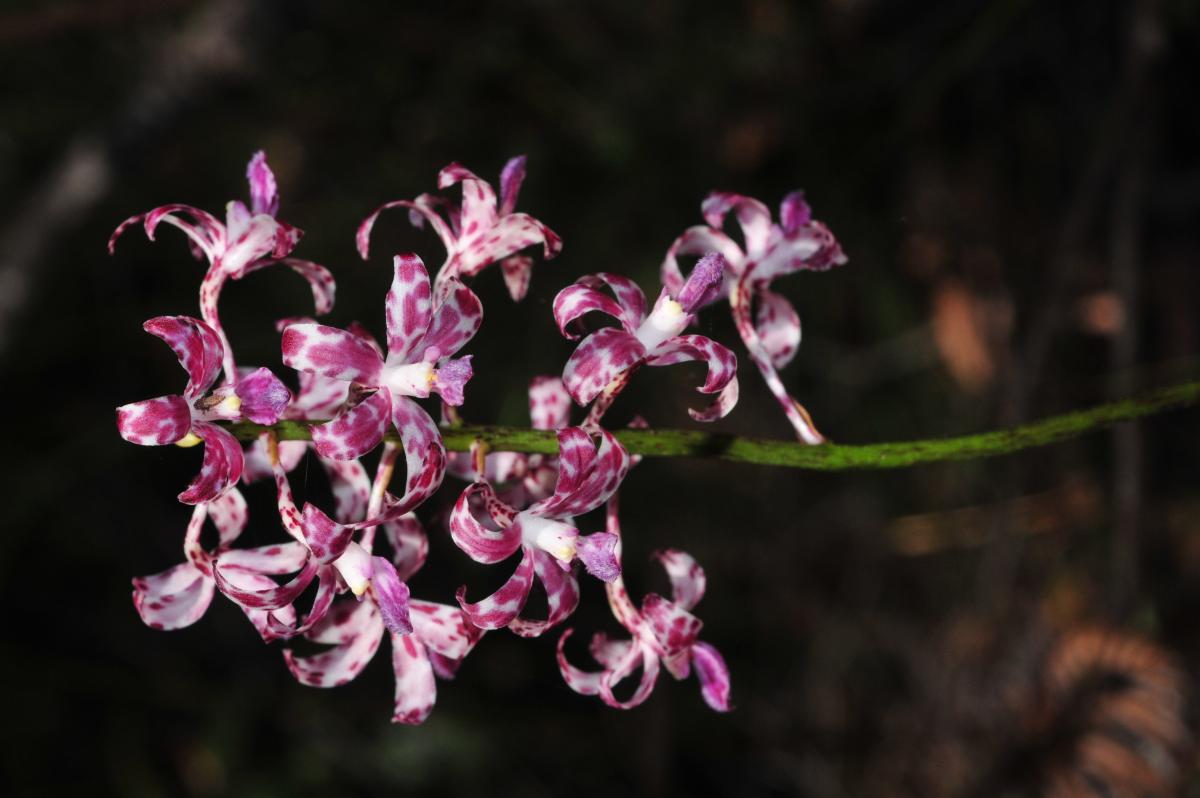
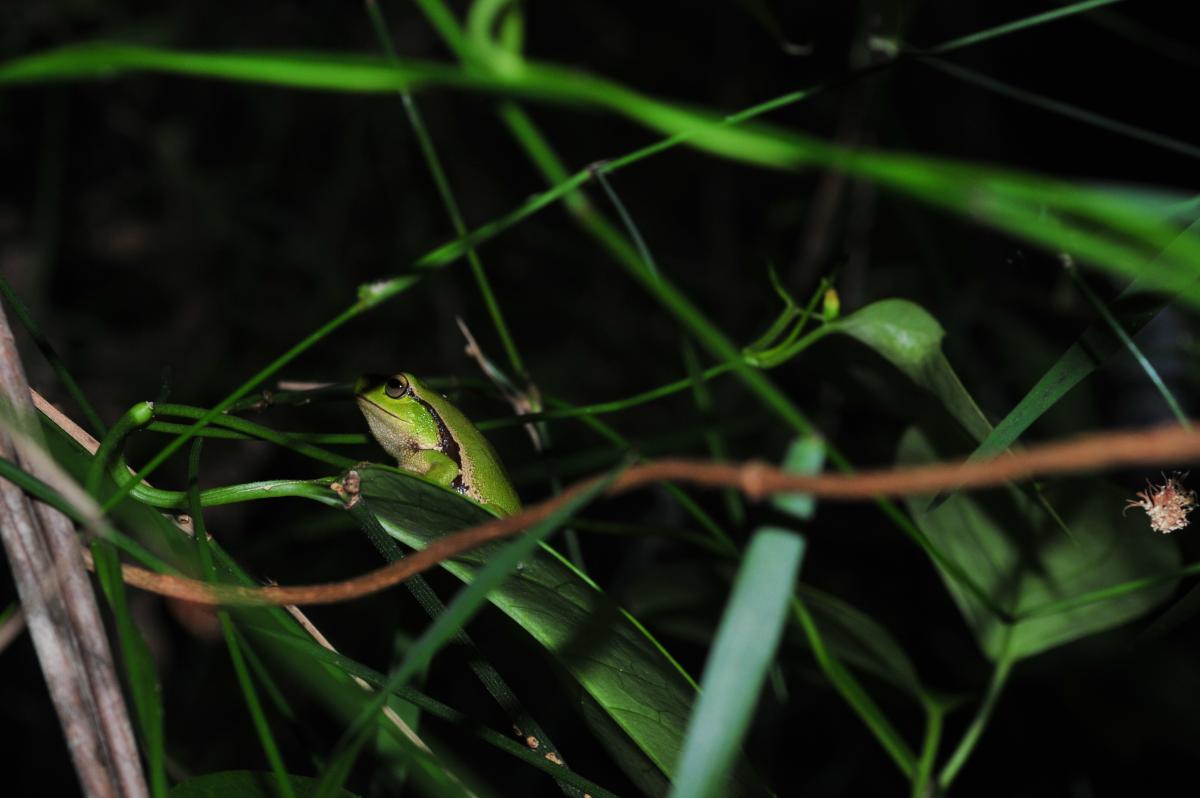
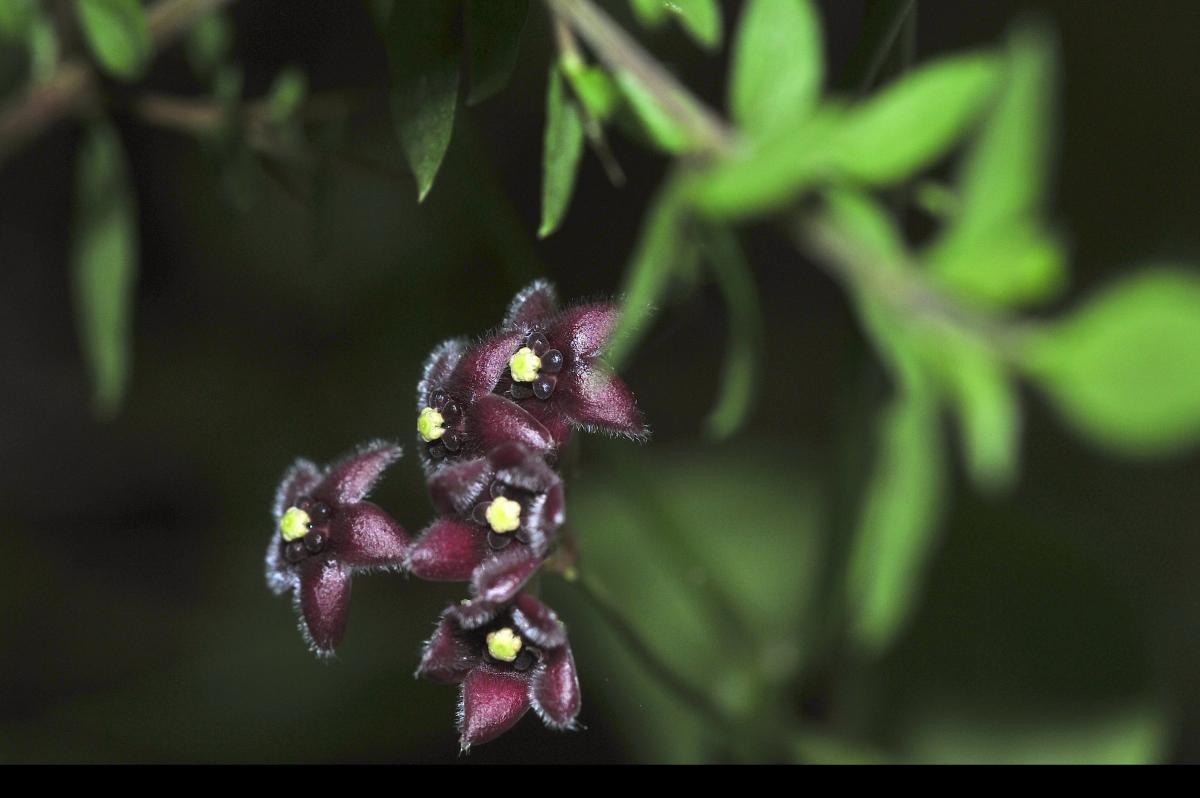
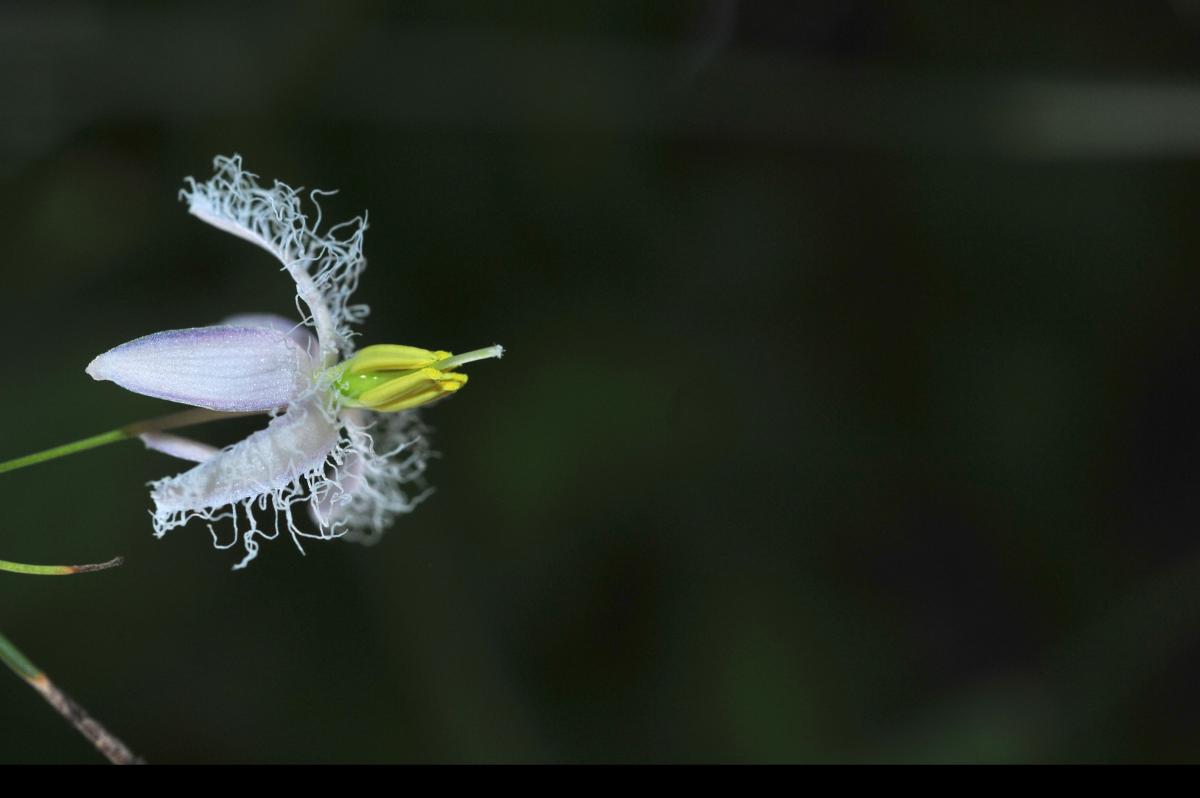
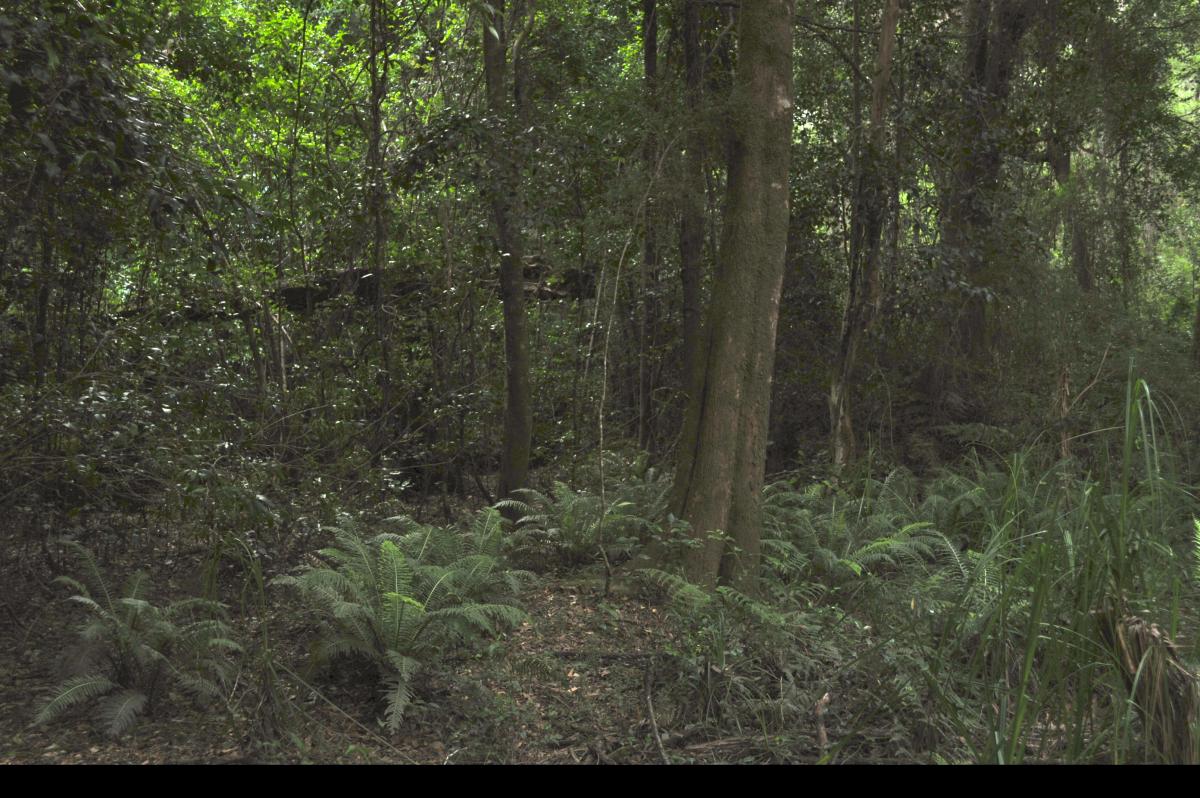
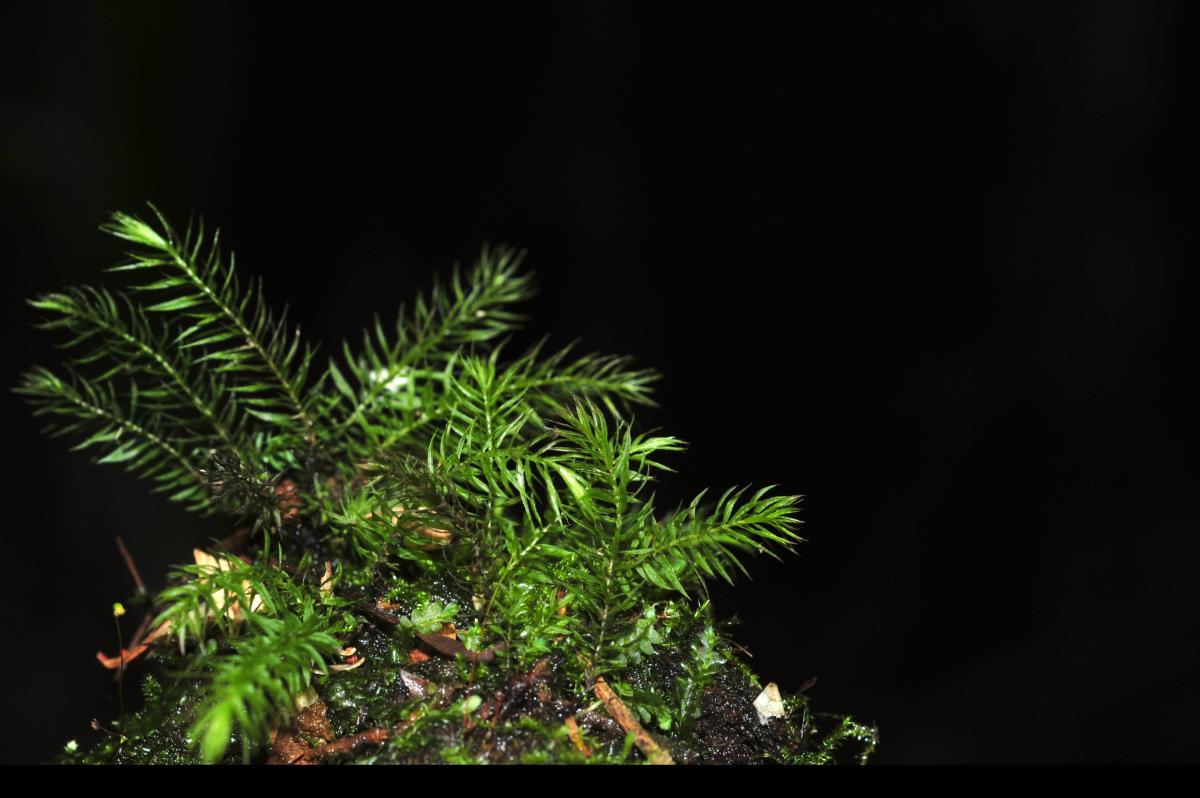
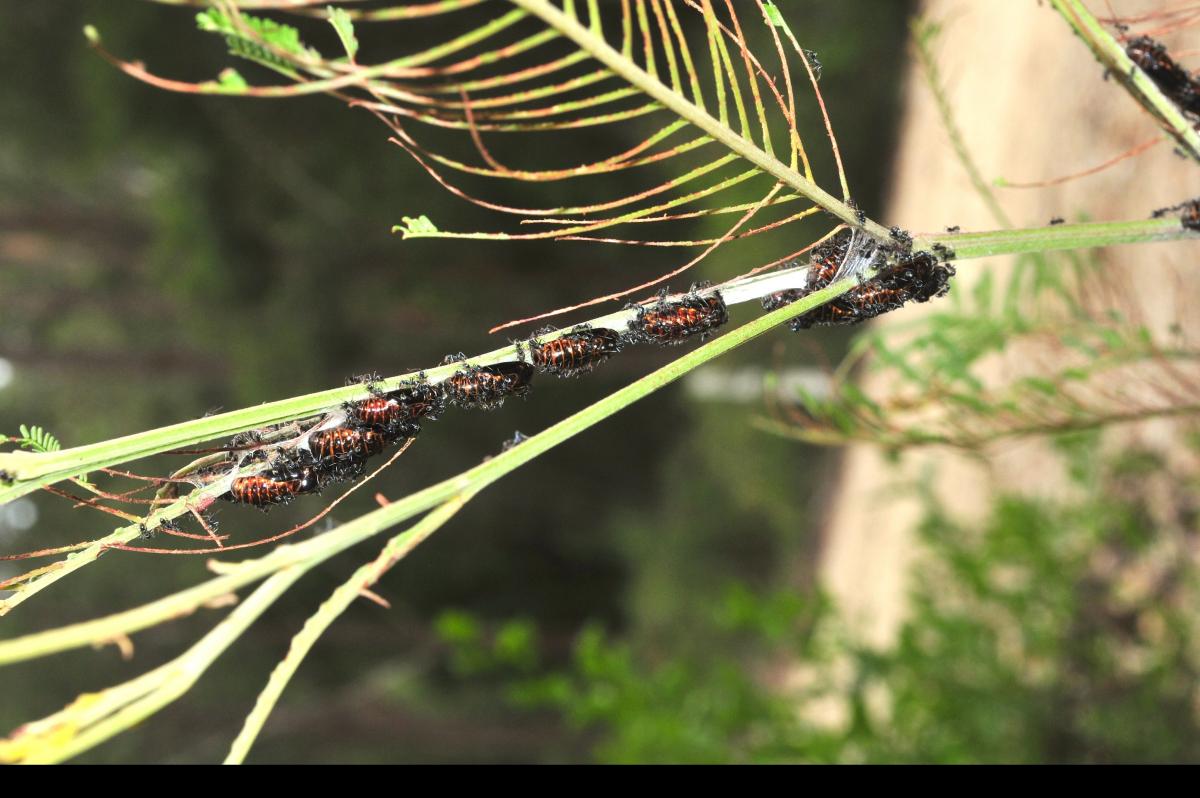
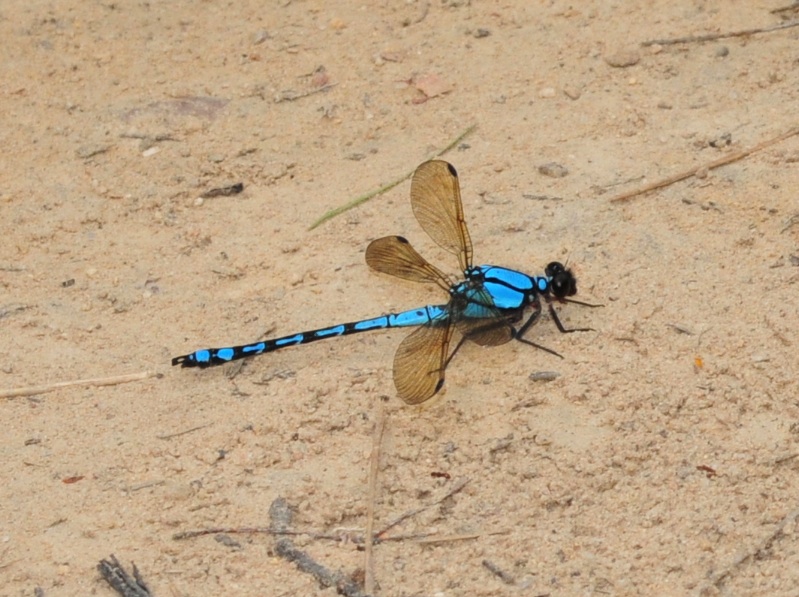
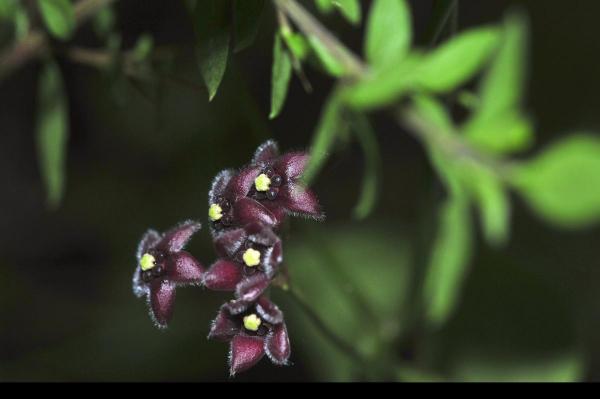
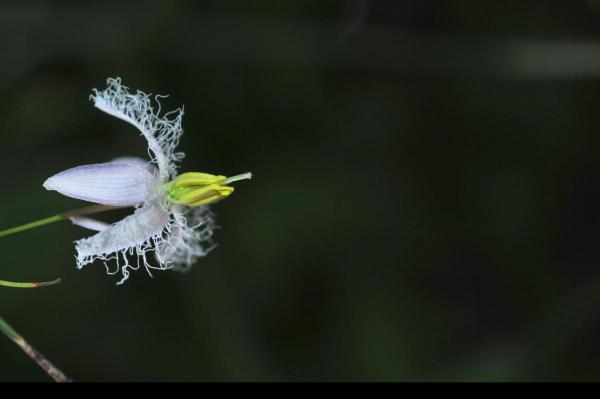
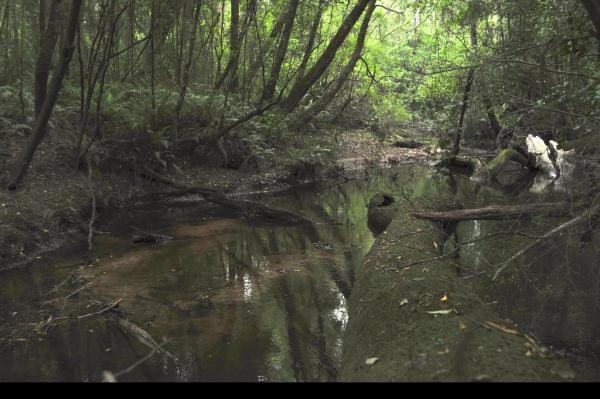
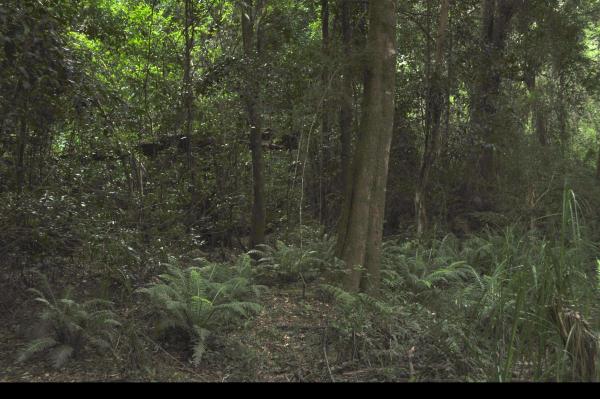
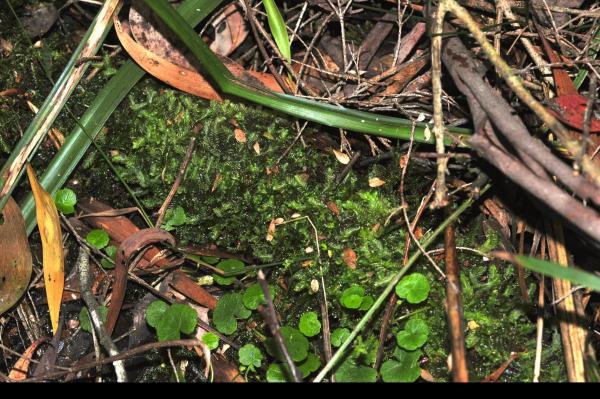
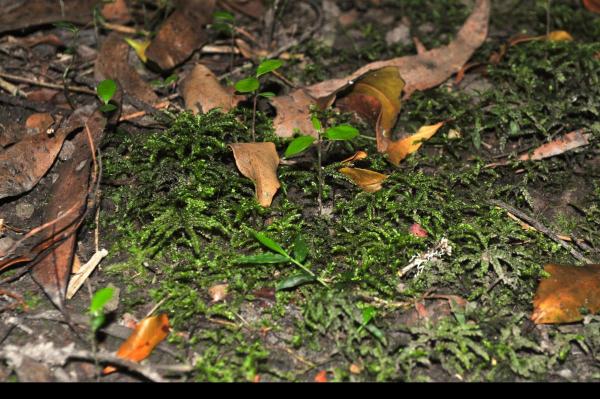
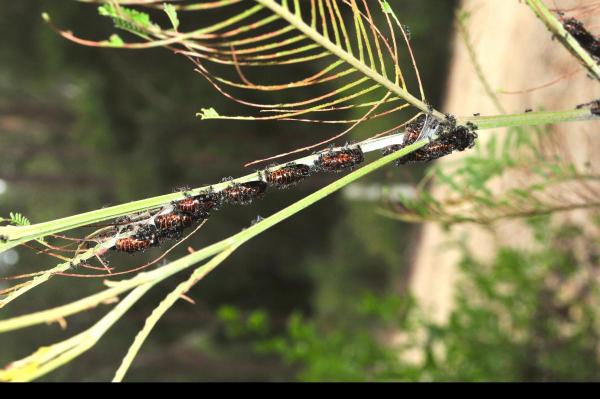
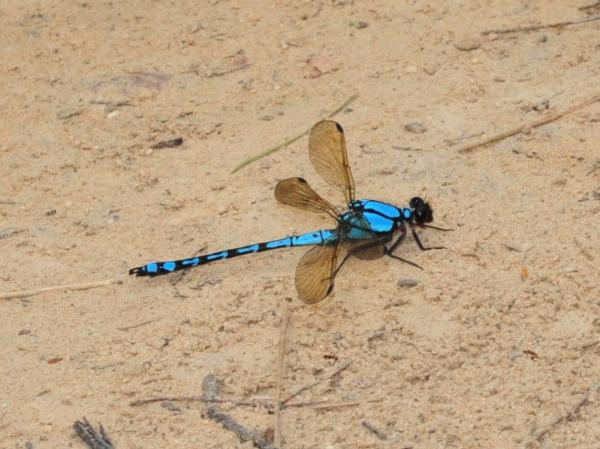
A mate and I just returned from East Gippsland after a couple of days running around hunting various things. As is normal for us we left Melbourne about 10pm thursday and drove until about 4am - that way we maximise our time out there and don't spend a potentially good day sitting in the car. We had a few objectives for the trip and as normal only fulfilled some of those. Our primary goal to check the last possible location in Victoria for a generally NSW Utricularia species (uniflora) had to be aborted for the second time, this time due to track closures and an approaching severe thunderstorm. The site is so remote it's no wonder that nobody gets out there. Next time we'll need a chainsaw in the car to get through. BTW I intend to bore you all with this non-aquarium stuff before moving on. Deal with it! A secondary goal was to photograph an orchid species in the same general area, which we did achieve: Dipodium variegatum, near Mallacoota Another secondary goal was to see a couple of tree frog species in the rainforest pockets out there. Litora citropa (Blue Mountains Tree Frog) is known from Victoria these days but we couldn't find any adult frogs, a shame as neither of us has seen this species in the wild. Litoria nudidigita was the other target and we found them in abundance. I have seen these before when they were still called L. phyllochroa but my mate had never seen them. Hunting frogs around rivers at night is not something I carry my camera for, so fortunately we also found one during the day: Litoria nudidigita, near Cann River We saw some interesting things walking around the rainforests. Unfortunately it was very dark and I discovered the tripod mount had fallen off my camera somewhere (doh), so the shots are all handheld and pretty average. For the flowers below (and frog above) I was standing on tip toes and just couldn't set the focal plane where I wanted. Asclepiad species (something like a Hoya) another nice tiny flower Thurra river tributary - typical sandy bottom and tannic water Forest floor We bumped into a young German bloke traveling alone and for his benefit I grabbed a nice male Water Dragon for him to photograph. That made his day, so a minute later my mate saw a White-lipped snake and I grabbed it too as it raced off the path. As I picked it up I saw the Tiger stripes on it and realised the mistake. We all got an uneasy laugh out of that but I think the young tourist will remember that walk for some time. Sorry but my hands were too full to get photos. Something I've only seen a couple of times before is the larvae of a butterfly - Jalmenus evagoras, the Imperial Blue Hairstreak, with its attendant ants. In the same way that terrestrial orchids fascinate me because of their reliance on a symbiotic relationship with mycorrhizal fungus, the butterfly family Lycaenidae (blues) fascinate me due to their symbiotic relationships with ants. The ants protect the caterpillars and pupae and are rewarded with a sugary secretion from the butterfly larvae. Nature is wonderful. At another site I was able to photograph a pretty amazing dragonfly, despite having the wrong lens on the camera. Eventually he allowed me to sneak close enough to get this heavily cropped pic: I'll wind up "part 1" here because of time constraints and prepare myself for part 2, which will mainly cover mosses, shrimp and their habitats.


 1 point
 -
1 pointLessen your WC to, when i cycle a tank i would probably only do 1 or so as everytime you are adding new water you are changing the conditions in the tank and imo affecting the establishment of the bacteria colony. Your bacteria colony is only going to be small cause your cycling therefor you want minimal impact whilst it grows. Ever heard the saying a watched kettle never boils ?1 point
-
 1 point
 -
 Holistic Shrimp Keeping After trying for 6 months to get a stable and healthy tank and failing dismally, I was using shrimp soil and following all the recommendations to keep shrimp everything was testing perfect but the shrimp were dying steadily. I then changed approach in the 6 months fighting with the tank and doing many hours of research I developed the approach I have been using now for the last 6 months with great success, it involves following a few basic principles that are a little different to the normal shrimp keepers mantra of shrimp soil, Ro (reverse osmosis) water and re mineralise with salty shrimp minerals and you won't have a problem well I was basically following this and had a lot of problems. What I feel is more important and my experiment has proven you don't need to spend a lot of money on expensive soils minerals and ro units to keep any shrimp, to prove my experiment I chose to use expensive high end shrimp that supposedly require very specific water conditions and you absolutely must use all of the above mentioned things or they will die. They have not only survived but are breeding happily. What I know to be of high importance the tank water parameters you choose must remain very stable, you must provide a complete ecosystem for your shrimp if anything is lacking the system crashes, you must provide healthy food preferably fresh or commercial food that doesn’t go sour. Shrimp are not as delicate as people make out they are mostly resilient and robust if you can put them in a bag and post them across the country with the posties using the parcel as a football and they arrive happy and healthy it puts that myth to rest but having said that any ammonia or sudden changes in the tank will kill them very quickly which is why they have the delicate reputation. The recommended parameters for the Taiwan Bee shrimp and the Crystal shrimp are as follows Ph 5.5-6.2, gh 6, kh 0, tds 150 ammonia and nitrite 0, minimal nitrate. My tank parameters are ph 6.8, gh 7-8, kh 3-4, tds 130 rest as required yes they are similar but to a shrimp keeper they are way outside what is recommended according to the rule book at 6.8 ph and kh 3 my shrimp should have died within a week or 2 and the babies shouldn’t have survived as they should be kept at a ph below 6. The reason they recommend the levels they do is because they are hostile to all microbial life in the tank essentially creating a sterile environment that they then add in only the things that are beneficial to shrimp growth and health the problem this poses for us in Australia is we don’t have ready access to these products so we can’t make a balanced environment and the shrimp die. I have setup my tank with normal aquarium gravel and pool filter sand no shrimp specific substrate as I found it gives a false sense of stability if it’s there you rely on it to make the water stable not make it stable yourself. I use rain water from a tank I then re-mineralise using readily available aquarium minerals to a level I have chosen. The tank is heavily planted with mosses and plants to provide biofilm for them to graze on and cover when needed. The rainwater starts at ph 5.6 gh 1 kh 0 tds 10 I then in a 20 litre bucket add about ¼ teaspoon of reef builder ½ teaspoon of equilibrium which gives a ph of 6.8, gh 5-6 these are the important parameters as this is the levels in the tank by matching them the water that comes out is the same as the water that is going back in this provides the essential stability that you need to keep your shrimp happy. I also add azoo mineral plus and bio plus as described as well as flourish excel and stability to provide essential bacteria for a healthy biosphere these are added each week with the water change. I have been using this approach now for 6 months with great success the reason it works when everyone will tell you it should fail is it provides the essential things for healthy shrimp: Stable water conditions with a ph below 7 this ensures any ammonia produced will be in the form of ammonium which is harmless to shrimp it also reduces the effects of nitrites A diverse bacterial colony that shrimp require for a healthy existence. A robust and healthy ecosystem that provide food and shelter for the shrimp Diverse foods for nutrition and health I feed my shrimp every second day from the following list: Shelled peas, dried shitake mushroom, organic rolled oats, chia seeds, and commercial shrimp foods like snowflake, max growth etc1 point
 -
Well, the happy dance has come out again! Spotted this girl today & this means she is carrying F2 babies, sooooooo exciting!!
 1 point