Leaderboard
-

Squiggle
Members2Points10433Posts -
Vlad
Members1Points31Posts -

jayc
Moderators1Points6248Posts
Popular Content
Showing content with the highest reputation on 11/06/14 in all areas
-
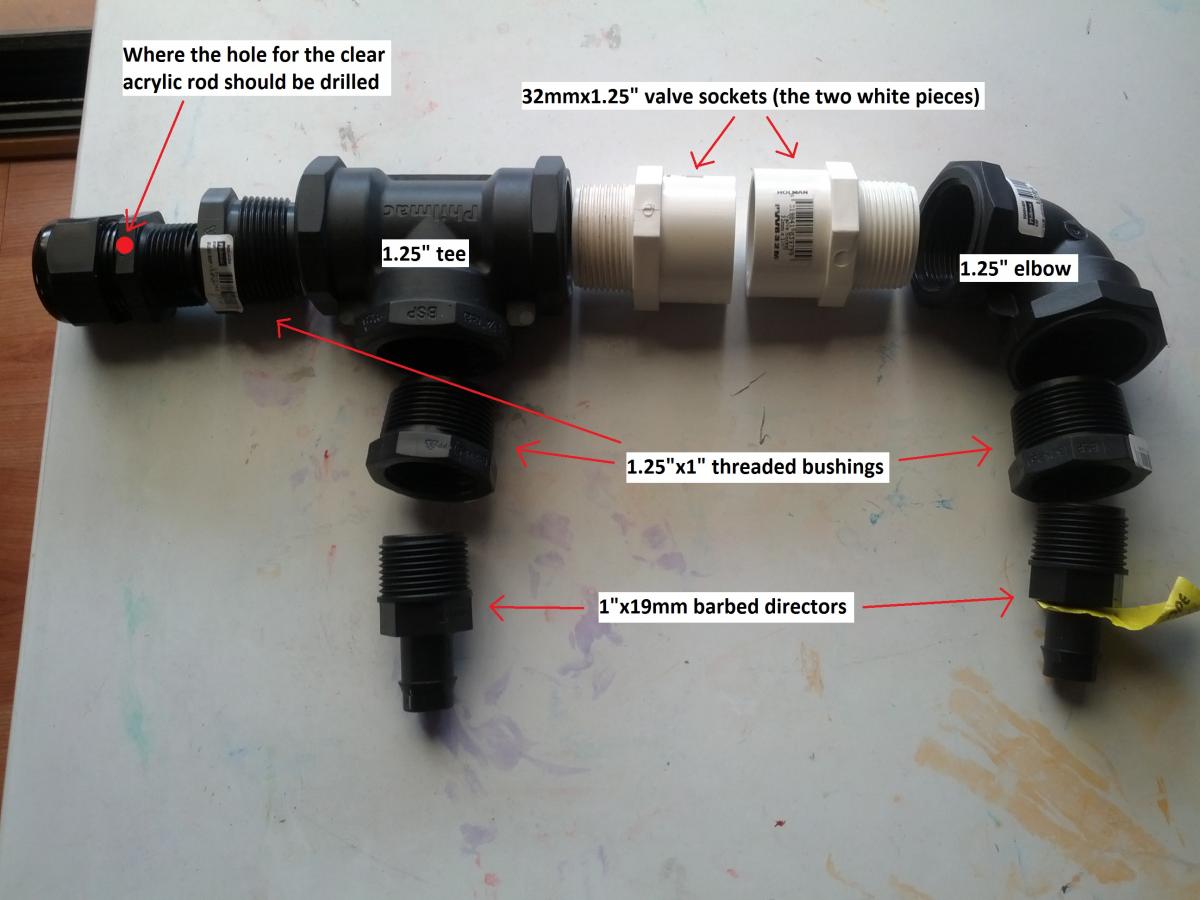
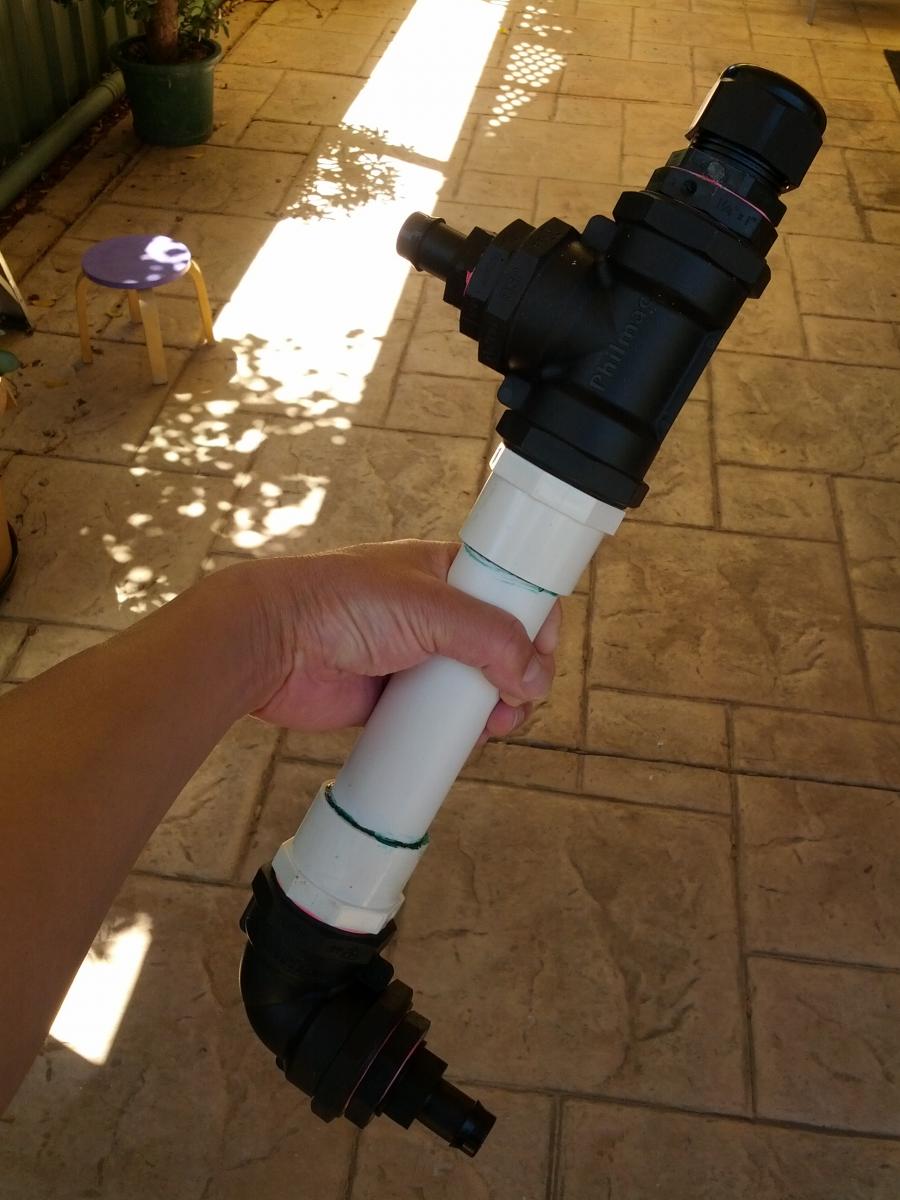
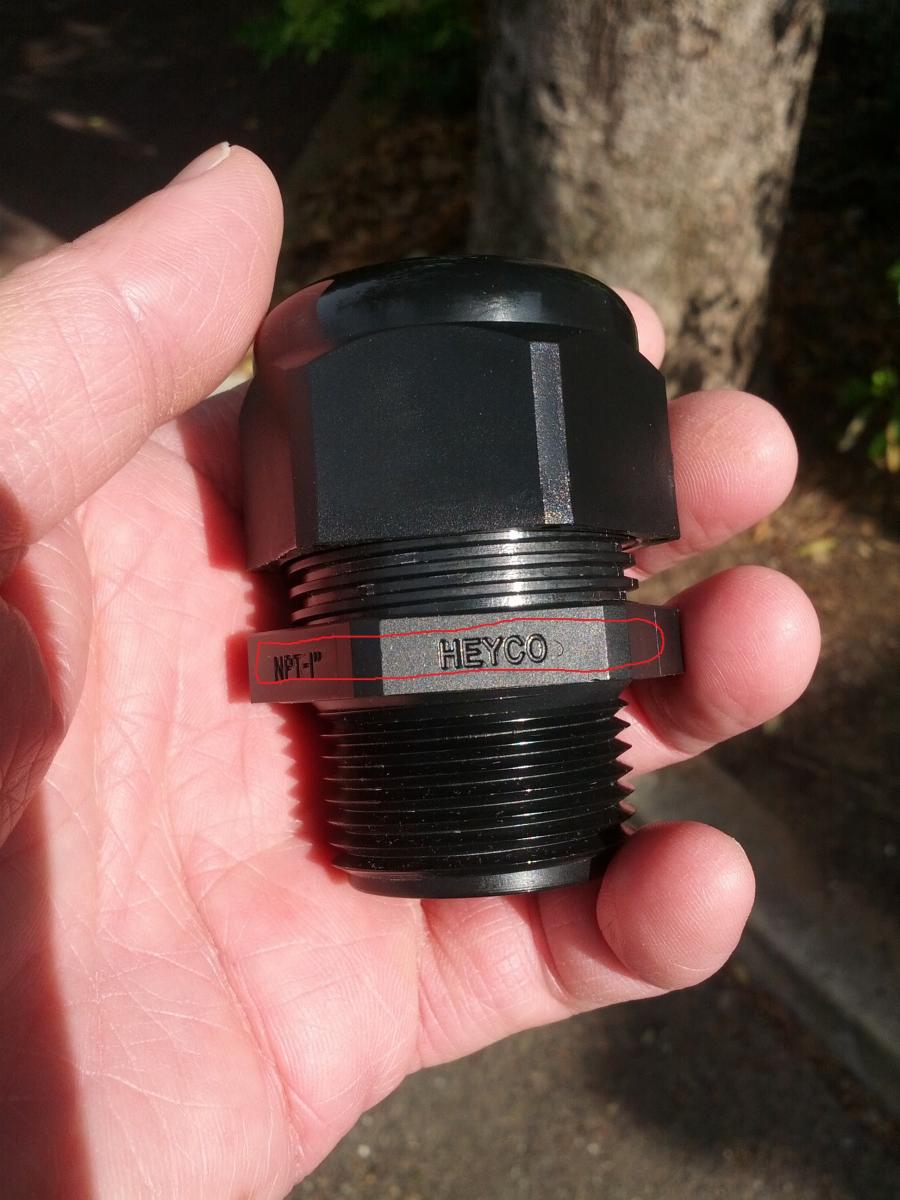
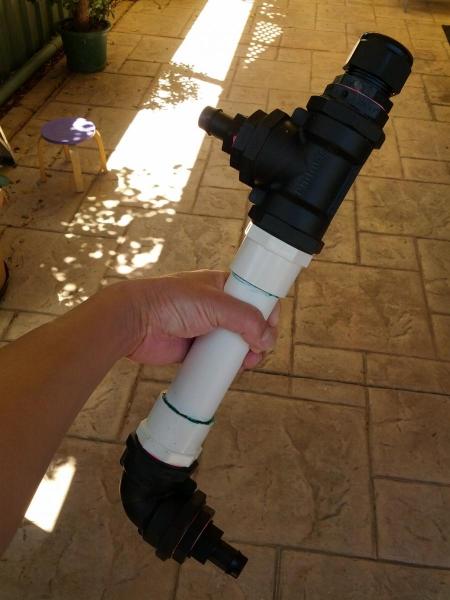
I mentioned I have a DIY inline heater in my journal and JayC asked for instructions so I am doing one here for anyone interested. The components are mostly available from Bunnings except for the Heyco cord grip which is available from NPA here in Adelaide. NPA is the sole importer and distributor of Heyco products in Australia. The components required from Bunnings are: 1x 1mx32mm Holman Press Pipe (the shortest length is 1m unless you can get an offcut) and is in the plumbing section (not in the picture). 2x 32mmx1.25" valve sockets. These slot over the press pipe to enable the threaded fitting to join onto (white in the picture) and is available in the plumbing section. 3x 1.25"x1" threaded bushing. One is for the Heyco to screw in and the other two are for the barbed directors. Again these are available in the plumbing section. 1x 1.25" elbow. Plumbing section. Irrigation section only has up to 1" ones, not 1.25". 1x 1.25" tee. Plumbing section. Irrigation section only has up to 1" ones, not 1.25". 2x 1" threaded x 19mm barbed directors (for the 16x22mm hoses). Available in irrigation section. You can use the 1" threaded x 15mm barbed directors for the 12/16mm hoses. High pressure cement glue. PVC primer (optional). Pink premium plumbing tape 2x Stepless hose clamps with wing nuts The component required from a plastics factory (like city plastics in Adelaide): 5mm thick clear acrylic rod (from plastics factories). It is a nicety to have but not really needed as you know if the heater is working or not via a thermometer. The component required from an auto shop like Supercheap Auto: Permatex black silicone (available from most auto stores like Supercheap) and only required if doing the clear acrylic rod. The component required from NPA: Heyco 8437 1" NTP cord grip. Even though it is NTP and not BSP threaded, as the thread length is less than 0.5", the thread pitch is very close and it screws into the threaded bushing without hassel. Available from NPA in Adelaide. I can purchase these and post them to interstate members if anyone wants them. Assembly Process (all plumbing tapes are wrapped to at least 8 layers onto the threads): Wrap the plumbing tape onto the thread of one of the directors and then screw into one of the threaded bushings. Wrap the plumbing tape onto the thread of the above threaded bushing and then screw into one end of the elbow piece. Wrap the plumbing tape onto the thread of the remaining director and then screw into the second threaded bushing. Wrap the plumbing tape onto the thread of the above threaded bushing and then screw into the T of the tee piece. Wrap plumbing tape onto the thread of the third threaded bushing and then screw into one end of the tee piece. Wrap the plumbing tape onto the thread of one of the valve sockets and then screw into the remaining end of the elbow piece. Wrap the plumbing tape onto the thread of the remaining valve socket and then screw into the remaining end of the tee piece. Wrap the plumbing tape onto the thread of the Heyco cord grip and then screw into the bushing on the other end of the tee piece. Place all the assembled pieces flat on a table (as seen in the picture) with the heater next to it to determine the length of the press pipe to cut and then cut the pipe as square as possible and smooth off with a file. Make sure the tip of the heater does not reach into the elbow piece as otherwise incoming water will hit it on the side. Remember the PVC pipe slots into the valve socket so take that into account when measuring the required length. Optionally apply the PVC primer to the bonding surfaces of the press pipe and the valve sockets. I just lightly sanded mine. Apply the PVC cement to the inside of one of the valve socket and then to the outside of one end of the press pipe (about an inch will do) and then push the pipe into the socket and press and hold for the specified amount of time. Decide how you want to lay your heater (both inlet/outlet facing the same direction, opposite directions or at some other angle). Apply the PVC cement to the inside of the other valve socket and then to the outside of the other end of the press pipe (about an inch will do) and then push the pipe into the socket (at the angle that you want) and press and hold for the specified amount of time. Use electrical tape which is elastic to tape the whole thing from top the bottom to provide pressure and leave for at least 24 hours. Optionally, if doing the clear acrylic rod, determine where you want the clear window on the cord grip to be and then drill a hole slightly smaller than the acrylic rod onto the part of the cord grip with the red dot in the first picture and highlighted in the third picture. That collar happens to line up perfectly with the heater light of the Eheim Jager heaters. Cut the rod to 15mm length and then polish one end and roughen the other end and a bit of the side of the same end (this will disperse the light so it can be seen from all angles). Apply the PVC cement to the side of the rod (at the polished end) and push into the hole of the cord grip and make sure it does not protrude into the cavity inside the cord grip. Use a tooth pick and cottom wool bud to apply a small amount of the Permatex black silicone to the base of the rod where it meets with the cord grip. This adds an additional level of leak proofing and let it all set for at least 24 hours. Undo the top nut of the cord grip and slot into the heater and then insert the heater into the housing and tighthen the nut until it clicks several times. This is the ratchet clicking which prevents it from losening. Attach a garden hose to the inlet barb (where the elbow is) and use layers of tape etc to make sure it does not pop off. Tape up the outlet barb with layers of tape so it too does not pop off and then turn on the water slowly. Monitor for leaks. Most of the time, the leakes will occur where one did not apply enough plumbing tape and/or not evenly. When I tested my builds, the water pressure got so high that it popped off the taped up outlet and still no leaks. If a threaded part leaks, undo the part and remove the existing tape and reapply the tape, making sure it is evenly layered and at least 8 layers. Once you are satisfied that you have tested it enough and there is no leaks, turn off the canister filter and drain out the outlet hose. Cut the outlet hose where you want the heater installed and the attach the filter cut end to the bottom barb of the heater and clamp with the hose clamp. Attach the othe cut end of the hose to the top barb of the heater and clamp with the hose clamp. Turn on the canister filter and ensure there are no leaks and there are no more bubbles coming out of the outlet (may need to gently rotate the heater to remove all trapped air) and then turn on the heater. As always, monitor for leakage for the next week or so. Picture of the parts: Picture of the finished product: Close up of the cord grip with the bit in red where you can drill the hole for the clear acrylic rod: Pic showing it painted and with the heater fitted: Close up of the seal of the cord grip with the clamping fingers and soft rubber seal on the inside: Anyhow, I can make these for Adelaide members at cost plus a little bit for my time. Message me if you want it. Cheers, Vlad

 1 point
 -
1 pointLol, 2x4 is 90mm x 45mm, 900mm is 90cm or roughly 3ft, hence why I said that's some pretty thick timber. M10 is plenty strong enough, but if you are worried then M12 will be better, M18 will definitely be overkill.1 point
-
1 pointAnti bacterial / Anti Fungal treatments part 3 Antibacterial + Antifungal - The guava leaf. The guava tree carries with it a little known fact. It has active ingredients in its leaves which fights against bacteria such as E. coli, Salmonella, Pseudomonas, Clostridium, and more. In the freshwater shrimp tank, guava leaves have been proven to prevent and eliminate the notorious gram-negative bacilli, facultative anaerobe bacteria, which are generally considered to be opportunistic pathogens-causing disease when shrimp are stressed. Add it to the tank much like you would Indian Almond Leaves, dried or fresh. Antibacterial + Antifungal - The banana leaf. Similar to the above guava leaf, but from the banana tree dur. Antibacterial, Antifungal, anti-inflammatory and anti-parasitic : Oregano oil contains many phytochemicals that have been studied for their health benefits. The main one that we will look at is: Carvacrol — a monoterpenoid phenol giving oregano its warm pungent odour. Medicinal actions include: antimicrobial, antitumor, antimutagenic, analgesic, anti-inflammatory and anti-parasitic properties. In other words - good for preventing bacteria, tumors, cancer, pain, inflammation and parasites. Carvacrol is considered one of the most active components of oregano oil. This oil has it all, being able to treat a wide variety of ailments from Bacterial, fungal, Viral and Parasitic. How to use: Carvacrol can come in many varying strengths, from 70% to 100%. Dilute it at roughly 1 drop to 5ml of water, and Soak it in some food for the ingestion (internal bacteria) or drop some in the water for external infections. Be sure to treat this outside of the tank, as Carvacrol is very likely to also kill beneficial bacteria. It is very important to dilute the oil, as it is very potent.1 point
-
1 pointLol, 900x900 is some pretty thick timber, 70x35 should be enough & make sure you get M10 rated timber, that stuff is what chippies use on the bottom storey when building a house, should be enough to hold a few tanks, lol1 point