Leaderboard
-
neo-2FX
Members2Points723Posts -

NoGi
HOF Member2Points5858Posts -

jayc
Moderators2Points6248Posts -

Madmerv
Members1Points219Posts
Popular Content
Showing content with the highest reputation on 11/30/16 in Posts
-
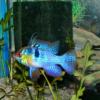
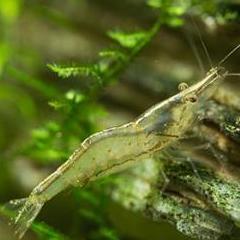
 1 pointSo the little snubnosed whiptail finally was in a position where I could actually get a few photos showing of his weird snout. The nose seems to have a left hand tilt and is definantly shorter/ blunter than the other whiptails I got at the same time from the same source. First photo from the side From above Side again Normal as comparison One of these days I may actually get a photo of the snubnosed beside a normal but for now this will have to do.1 point
 -
1 pointI have been quietly maintaining my articles or posts in the background, and when I have some spare time. So I think any from me should be okay.1 point
-
1 pointI like the clean look @NoGi. Very easy to find what you're looking for. Thanks!1 point
-
 1 pointYeah that's pretty much exactly how's I did mine, except my water level is halfway across the shrimp guards. Be careful the way you've done the shrimp guards, in my design I ended up going with 4 holes to rectify This issue, cause if your water level is above the shrimp guards it's likely slowly rising, or going to cause issues And you won't have much room for error If the guards block. :) this is also why I didn't use proper bulkheads in between the tank and overflow, should still be ok though. looks good.1 point
 -
1 pointFinal installment for this build. First up i was given some stainless steel mesh so sticking with DIY, made up some filter guards. My wife crafts a bit so got hold of her hot glue gun and kind of followed a DIY tip on here to hot glue them together. Used zip ties to hold them in shape and just cut them off and glued over the gaps. Fitted the tank overflow glands and screwed them on as they were that snug a fit. Freaked out a bit when i realized the overflow holes were now smaller and had the restriction of guards, so the tank now fills up more. The sump emptied more and i thought it might suck dry. The other problem i thought i might have is that if i fill up the sump more i would not have the capacity to hold all the water if the power goes off. No problem in the end when everything settled and i could check the volumes. Turned everything off and let the tank fully drain, topped the sump up to max and switched it all back on. When everything settled again i now have a max running water level. The tank came with a 3000l/h pump and i also installed a 700l/h that was sitting in the shed. Bit of redundancy if the main pump dies so i have time to source a new one and 3700l/h is a good flow. Next was fix the drain tap. Another bunnings trip and a new tap with a 19mm spigot is now installed. 10m of 19mm flexi hose to water the garden with and to decrease my water change times. The lids of this tank did not have any easy way to lift them so knocked up some handles out of the spare glass (cause i'm such a glass cutting guru now). Finally add some plants. All photo's had to be taken at night as the reflection was terrible during the day, so i grabbed 2 30cm led's off my other tanks and positioned them, or held them, for the shots. The filters. Lid handles. Sump setup. Rocks holding the wood down. The white rock on the top was proving difficult to tie so i just put it on the small bit of wood that i needed down. And finally a FTS.1 point
-
1 point
-
 Reading around on it says that it can lie dormant for a very long time, and it tolerates high and low temperatures pretty well. Salt Baths seem to have mixed results (better results in fish with higher tolerances, because you can use more salt), and the others like malachite green, potassium permanganate may need to be at fish tolerable strength to work? It definitely sounds like a real scourge. If I were in your shoes I'd probably not restock the tank, keep taking care of whoever is left in it until they have lived out their life, and try to determine how the parasite got into your tank. Then once everything has passed on I'd tear the whole tank down and sterilize it thoroughly.1 point