Jump to content

New Library Article - DIY Aquarium


FMuscle

Recommended Posts

What is the most important piece of equipment in the keeping of aquatic flora and fauna? The Tank.

Some of you have probably noticed. But for confirmation, I am a big fan of not paying if I don’t need to. This means I’m a big fan of DIY. I made PVC overflow and return pipes tailored to my 3ft, I made a $10 sump for it as well, I built an air powered substrate vacuum. I made my life cheap and easy for this hobby.


IMG_7160.jpg
IMG_7243.jpg

This article came at the expense of a disaster. I bought a 6x2x2 tank. It cracked. 

Not to throw the towel, I took it apart, had panels cut in half, new panels made, and here is my tutorial on how to build your own fish/shrimp/planted tank. First, build a stand for the tank.

IMG_7227.jpg

Get your glass panels ready. To figure out what sizes you need, remember that the bottom supports the sides. Your bottom panel has to be the exact width and length as you planned tank. A 100x50x40 tank with 10mm thick glass needs a 100x50cm bottom panel.

The front and back are the same width as the bottom, but the glass’ thickness shorter than the projected height. For the example, front and rear panels would be 100x39cm.

The sides sit on the bottom, and between the front and rear panels. Subtract the thickness from the height once, and for the width twice, here the sides would be 48x39cm. If you are reusing old aquarium panels, scrape them clean with a razor blade, then wipe off any silicone residue with acetone. Let dry.

IMG_7203.jpg
IMG_7277.jpg


Tools needed:
IMG_7280.jpg
IMG_7282.jpg


A good razor blade or sharp utility knife, tape, either electrical, masking or both, a caulking gun, twice the silicone tubes you think you’ll need, optional are suction cup handles to move the glass around, I did this build alone, it helped for the big panels.


Get your work area ready, cover the floor, table, bench you’re working on. Have moist rags and/or gloves at your disposal. Make sure your work surface is flat, clean of debris and level. Put your panels within easy reach.


You have limited time to work with silicone, it starts to skin, to dry its surface fairly quickly, so you have to be organised. The longer the seam, the faster you need to work.

IMG_7283.jpg


Apply the first bead of silicone on the bottom panel where the rear panel will sit. How thick depends on how experienced you are, and how thick your panels are. In my case, I did a bead of around 10mm, because my glass is 10mm thick. Do not worry about putting too much. Too much is better than not enough.

IMG_7284.jpg


Put the rear panel in place, making sure it sits right on the edge of the bottom panel, flush on both sides. Have someone or something hold the panel up for a moment.


IMG_7285.jpg


Apply a bead of silicone on one side of both the bottom and the rear panel, and while keeping the rear panel slightly tilted back, put one of the side panels in place on the bottom panel. Then bring up the rear panel and push it against the side panel, making sure they’re square and flush with each other. They will now hold each other with the silicone. Put a piece of tape or two across the corner as extra support.


IMG_7286.jpg


Repeat the operation on the other side, this time lay the side panel a few mm off to the front and slide it in place against the rear panel. Make sure they’re square and flush, and tape them.


IMG_7287.jpg


Apply silicone on the front top edge of the bottom panel and the edges of both side panels. Bring your front panel at an angle, sit the bottom first, make it flush to bottom panel, then press it against the sides. Square, flush, tape.


IMG_7289.jpg


Let the tank cure for about 24 hours. Watch your berried shrimp in the meantime.


IMG_7310.jpg


Once the silicone is dry, remove the excess with a sharp blade. Trim the inside carefully, just to remove the excess and not to dig and cut between the panels. There is no real need to use acetone there, it is mainly used because new silicone doesn’t stick well to old silicone. So unless you went crazy on the amount of silicone you put on the first part and it went everywhere, you can leave the little bits around the corners.


IMG_7323.jpg
IMG_7321.jpg


Tape the edges of the tank leaving the corners exposed. About 5-10mm is good, some prefer to leave a wider gap around the bottom.


IMG_7324.jpg
IMG_7325.jpg


Apply silicone to the corners, starting around the bottom, then go up in the corners. You don’t need much there, a good bead size would be around 80% of the gap you left with the tape.


IMG_7328.jpg


Smooth out the silicone with your finger to give it a nice concave shape. 


IMG_7330.jpg


Remove the tape while the silicone is still wet. Take care of not putting silicone everywhere and not to destroy your awesome corners as you remove it.


IMG_7331.jpg
IMG_7335.jpg


Let the tank cure once more, for three to seven days this time. Why not watch your fish play in the bubbles?


IMG_7273.jpg

After the curing is done, do a test fill. If possible do it outside. If not, I suggest doing it slowly, adding a few cm at a time and constantly monitoring the seams for any signs of leakage.


IMG_7348.jpg
 

The test fill is also a good moment to see if you need to brace your tank. As you fill your tank, measure the distance between the front and back on both sides and compare the results with the measure in the center. If your panels are bowing by the same or more than their thickness, I’d recommend a brace. In this case, the bowing is only 1-1.5mm while the tank is ¾ filled. I do not need bracing.


IMG_7351.jpg
 

If everything is in order, scape, plant, fill, cycle, stock and enjoy your new DIY tank.


IMG_7349.jpg


Side note: if you are building a small tank, the cure period between the assembly and the reseal may be skipped by working fast enough to smooth the silicone as you go.


On bigger tanks, like my 6ft, by the time I fit the panel, the silicone is already drying where I started to lay the bead, making it impossible to create a clean seam.


My tank's specs: 6X2X1 (1830x610x310mm) 10mm thick glass. Filtration: Sponge + double overflow to sump (to be built).


Stand: DIY 70x35 timber, 1830x610x800.


View full article

Link to comment
Share on other sites

Create an account or sign in to comment

You need to be a member in order to leave a comment

Create an account

Sign up for a new account in our community. It's easy!

Register a new account

Sign in

Already have an account? Sign in here.

Sign In Now
  • Join Our Community!

    Register today, ask questions and share your shrimp and fish tank experiences with us!

  • Must Read SKF Articles

  • Posts

    • sdlTBfanUK
      I would hazard a guess that perhaps those eggs were unfertilized and thereby unviable? Did the eggs change colour, usually yellow to grey as the yolks used up, or any eyes in the eggs. Is your water ok, using RO remineralised and the parameters in range, as I have heard others say that if the water isn't good it can 'force' a molt? How is it going overall, do you have a good size colony in the tank, you may have reached 'maximum occupancy' as a tank can only support so many occupants.
    • beanbag
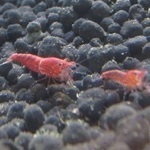
      Hello folks,  The current problem I am having is that my Taiwan bee shrimp are molting before all their eggs have hatched.  Often the shrimp keep the eggs for 40+ days.  During that time, they lose about half or so, either due to dropping or duds or whatever.  Shortly before molting they look to have about a dozen left, and then they molt with about half a dozen eggs still on the shell.  Then the other shirmp will come and eat the shell.  These last few times, I have been getting around 0-3 surviving babies per batch.  I figure I can make the eggs hatch faster by raising the water temperature more (currently around 68F, which is already a few degrees higher than I used to keep it) or make the shrimp grow slower by feeding them less (protein).  Currently I feed Shrimp King complete every other day, and also a small dab of Shrimp Fit alternating days.  Maybe I can start alternating with more vegetable food like mulberry?  or just decrease the amount of food?
    • ngoomie
      Yeah, cancer risk was a thing I'd seen mentioned a lot when looking into gentian violet briefly. I kinda just figured it might only be as bad as the cancer risk of malachite green as well, but maybe I should look into it more. I've been doing a pretty good job of not getting it on my skin and also avoiding dunking my unprotected hands into the tank water while treating my fish at least, though. Maybe I'll just not use it once I'm done this course of medication anyways, because I know a store I can sometimes get to that's pretty distant carries both malachite green and methylene blue, and in pretty large quantities.
    • jayc
      Can't help you with Gentian Violet, sorry. It is banned in Australia violet for potential toxicity, and even possible cancer risks. I thought it was banned in Canada as well. At least, you now know why there isn't much info on gentian violet medication and it's use. But keep an eye on the snails after a week. If it affects the snails, it might not kill them immediately. So keep checking for up to a week. Much safer options out there. No point risking your own life over unsafe products.
    • ngoomie
      Hello! I have a tank that currently does not contain shrimp, but does contain neon tetras which I am currently treating for Ich, as well as some bladder snails. Shrimp will be a later addition, likely cherry shrimp but I'm still doing research just to be sure. Initially I'd intended to buy some sort of Ich-fighting product that contains malachite green after doing a decent bit of research on it, most of which indicated that it should be shrimp-safe so I'd be good if I ever needed to use it again once shrimp were actually introduced (though I should note I'm aware shrimp can't get Ich, I'm more wondering in case the tetras could get Ich again, or something else that responds to similar medication). I ended up not being able to find any MG-containing products without either having to travel quite far or wait multiple days for delivery (which I was worried could lead the Ich to be fatal), and ended up picking up 'Top Fin Ick Remedy', a product that contains gentian violet which is a triarylmethane dye like malachite green. The bottle has two slightly differently worded warnings about its use with invertebrates ("not recommended for" and "not safe for" respectively), but when I'd been researching malachite green, I'd also heard of products that contain MG but not any other ingredients that would be harmful to inverts still being branded with warnings that they could be harmful, just as a "just-in-case" since the manufacturer didn't test it on any inverts, and I'm wondering if maybe it could be a similar situation here. I'm having a very very hard time finding information about gentian violet's use in fishkeeping at all though, it seems currently extremely uncommon. What I will say though is that I'm on day 2 of treating my tetras with it, and the bladder snails seem just fine -- in fact today I noticed what looked to be a bladder snail that appeared to be newly hatched (because of its size) that I hadn't seen before that was zipping around the tank without issue. But obviously, shrimp are not snails, and bladder snails are also notoriously hardy little guys, so what I'm seeing right now could easily be totally inapplicable to cherry shrimp. It might even be inapplicable to other species of snails, for all I know. Has anyone else here ever used anything that contains gentian violet in a tank that actually does contain shrimp? Were they okay, or should I make sure to not use it once shrimp are added?
×
×
  • Create New...